Happy Friday! The last few weeks have been crazy over here, mostly with the end of summer, and mostly with the start of school, but in huge part because there are some big changes I’ve been working on that are coming to Merrick’s Art, one of which is DIY FRIDAY, which will now be a permanent thing! So if you’re looking for my tutorials, make sure you stop by every Friday, because I’ll have something new for you to make every single week!
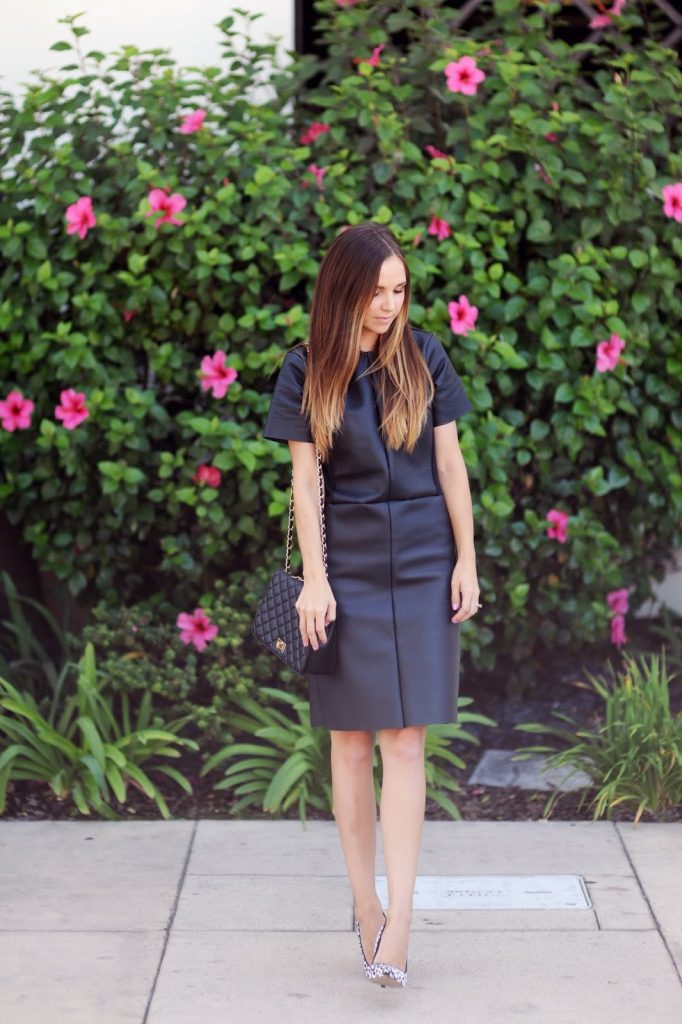
To kick off DIY FRIDAY, I have a super fun tutorial and giveaway for you! Last month, during the Nordstrom Sale, I ran across this amazing leather Halogen dress, and instantly wanted it. It was a little too short for me, and a little too expensive, so instead I teamed up with Leather Hide Store and made my own, and today I’ll show you how!
I had some serious doubts about this dress up until the very last seam, and sewing through this thick leather was not very easy, but I feel so proud of this dress and learned a ton while making it. I’m so excited to share it with you!
Find the full tutorial after the jump, and don’t forget to enter the giveaway at the very bottom!
note: I have received some amazingly helpful feedback over the last few months regarding my tutorials and have decided to switch back to step by step photographs rather than my illustrated tutorials. I hope this gives you clearer instruction and makes it easier to follow even if you are a beginner seamstress! Also, video sewing tutorials are coming soon as well so get excited!!
Materials:
12-15 square feet of pigmented leather (mine was from their
remnant section)
1/2 yard black ponte knit
20-22″ heavy duty zipper
leather needle for your machine (very important!)
matching thread
Step 1. Cut out your pieces. You will need 2 LEATHER BODICE pieces, 4 LEATHER SKIRT pieces, 2 LEATHER SLEEVES (cut on the fold), and 2 KNIT BODICE BACK pieces, as shown below.
I used a boxy tee and a fitted pencil skirt as my pattern, and then adjusted the angled side seams on my own. Also, when using your clothing as a pattern, always cut the pattern out of pattern or parchment paper and then use that as your pattern — don’t lay your clothes directly on your fabric and try to cut. (A tutorial for making patterns out of your clothes is coming soon!!)
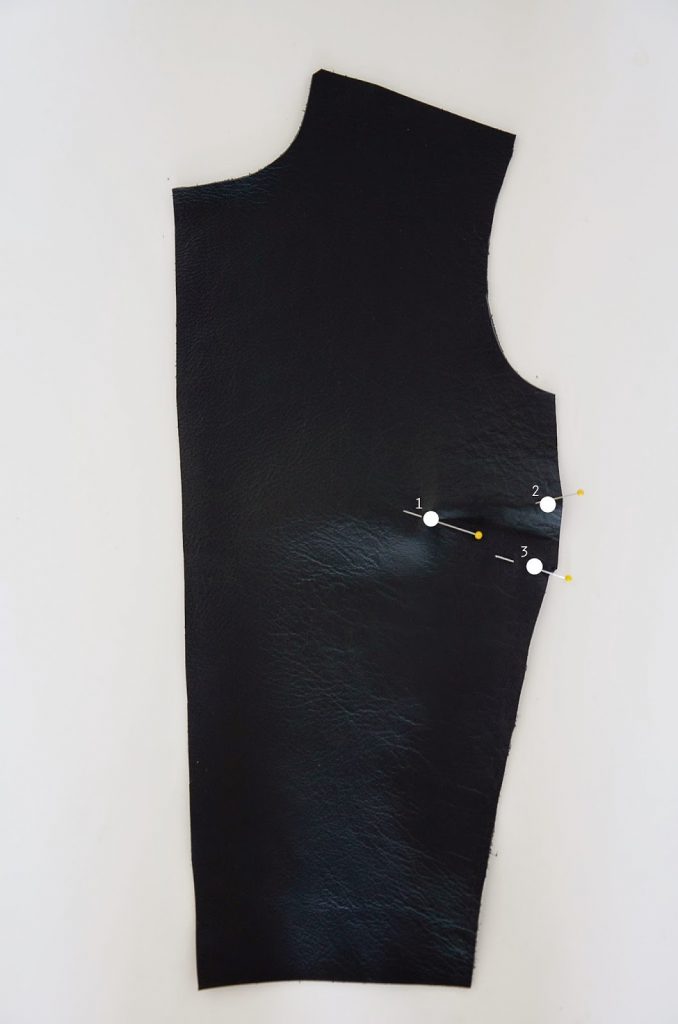
2. First you need darts. Take your LEATHER BODICE pieces and mark your dart placement in three places, as shown.
Then hold mark #1 in place and fold your BODICE in half so #2 and #3 are touching. Pin in place and then sew from #2/#3 and slowly angle up toward #1 until you run off the fabric. Repeat for the second LEATHER BODICE piece.
Now your two LEATHER BODICE pieces should look like this:
3. Take your two LEATHER BODICE pieces and, with right sides together, attach them with a straight stitch along the center edge.
4. Next, take your BACK BODICE pieces and attach them to your FRONT LEATHER BODICE at the shoulders with a straight stitch.
5. Once both of your BACK BODICE pieces are attached at the shoulders, sew up the side seams of the bodice with a straight stitch and right sides together.
6. Take your SLEEVE pieces and fold them over with right sides together. Sew up the inseam with a straight stitch. Repeat for both sleeves.
7. Now it’s time to attach the sleeves to the bodice. Find the very top of the SLEEVE piece (where the red dot is) and, with right sides together, insert it into the arm hole, lining up the “red dot” with the bodice’s shoulder seam (the other red dot). Once those are lined up and pinned in place, pin the rest of the sleeve into the arm hole.
Then sew around the entire arm hole with a straight stitch, as shown below. Repeat for the second sleeve.
8. Now let’s move to the skirt. Take your two FRONT SKIRT pieces and, with right sides together, sew them together at the center seams.
9. Now take the BACK SKIRT pieces and attach them to the FRONT SKIRT at the side seams.
10. Now it’s time to attach your bodice to the skirt. Lay them flat on the ground on top of each other with right sides together and line up the center seams. Pin in place and sew across the entire waist with a straight stitch.
11. Now sew up the back seam from the neck to the hem.
Then insert your zipper up the back of the dress using the instructions on the zipper package.
12. Now it’s time for the neckline. Cut two pieces of ponte knit that mimic the shape of the back and front of your neckline (as shown), but make them 1-2″ shorter so they have to be stretched to reach around the entire neckline. This will be the neckline LINING. Sew them together on the sides to make a full circle, then cut the back down the middle (as shown).
Pin the LINING to the neckline, matching up the side seams, and stretching as you pin so the lining fits all the way around. Sew around the neckline with a straight stitch, attaching the lining to the neckline. Trim your seam allowance.
Now fold the LINING inside the dress and pin in place. Then sew around the entire neckline with a wide straight stitch to secure the lining in place. Make sure you tuck in the ends of your zipper if necessary!
13. (not pictured) Hem your sleeves and the bottom of your dress, if desired. I didn’t want a bulky hem on mine, so I just used my rotary cutter and ruler to cut the edges super straight and clean.
And you’re done! Can you believe it? You just made a leather dress!!
Now on to the giveaway!
Leather Hide Store is giving away $50 to their shop so you can pick up some leather too — you don’t even have to use it to make this dress! Add it to a t-shirt for some edgy embellishments, make a bag, make a pair of moccasins, make a pillow…do whatever you want!
All you have to do is like them on Facebook through the Rafflecopter widgetfor an entry, so enter below! Good luck!


First off, Holy Hotness!! You are workin’ it! 2nd, that dress is amazing. Too bad I am awful with anything sewing otherwise I would have tried this.
Thanks, Jenn! And maybe my upcoming sewing videos will help you! xo
It looks awesome! This is so timely because I literally just bought some leather yesterday, but I’m planning on making a skirt with mine. Do you have a general tips about sewing with leather? I’ve heard you don’t have to hem, serge, or zigzag because it doesn’t fray, and I do imagine it is thicker to sew through. Did you use a leather needle, or did you get away with a universal one? I would love to know! I am SO excited about sewing videos. I think they will be perfect for people like me who really benefit from seeing it done, even over photos. I’m excited!
DEFINITELY use a leather needle. And do a lot of pinning because when you have the slippery sides of your leather together (right sides together), your leather will slip and slide around if it’s not pinned well.
Good luck!
Thanks! I will have to go get a leather needle and I will be sure to pin more. I usually pin pretty sparingly so that is definitely good advice 🙂
I’ve been researching tips and techniques for sewing leather lately. You’re tutorial is perfectly timed and your dress is super cute!! Good job!!! I read on the sewastraightline blog that if you protect your leather with a thick cutting board, you can hammer the seams to make them lay flat!! I haven’t tried it yet, but her pics are convincing!
Good tip! Thanks for sharing!!
This turned out great! I have sewn on leather before and it was extremely difficult. Mainly with the hem, I didn’t even considered leaving a raw edge. Habit I guess. I”ll know for next time, thanks.
I know — hard to leave a raw hem for me too sometimes, but in this case I think it worked!
Wow!!! This is such an amazing post and SO inspiring!! I love using my hands and imagination to create something unique and you did fantastic job creating this dress! I mean, I’m speechless!!
http://lartoffashion.blogspot.com
Thank you so much!
I have a feeling my sewing machine and I are about to get in a really big fight over this dress. So gorgeous. Thank you for sharing!
Nightchayde
Ha! Just go slow and you’ll be fine! Let me know if you have any questions along the way!
Love your hair color and of course, super cute dress! (:
Thanks, girl!
you are just way too talented! LOVE those shoes!!
xo,
Sandy
Sandy a la Mode
So excited that you are expanding your tutorials! Can’t wait to see what you come up with, and hopefully make some new things of my own.
Super creative (and you look gorgeous) but my sewing brain is freaking out about the seams. Let me explain, one of the (many) things that sets a homemade piece apart from a couture piece is the diligent pressing of the seams. Otherwise they just look, well homemade. So how do you take care of that when working with leather? Would topstitching be an option, is there something else even better, am I crazy (highly likely)?
Love your work!
Ha! Sorry to make you go crazy over the seams. I tried a bunch of methods and got it to lay down much more than it was before, but it could definitely use some more help. Some of the commenters have made great suggestions if you want to look through those!
Although I have to defend my dress a little and say that even though I whole heartedly agree that pressing the seams makes a huge difference in the professional feel of a piece, I don’t think this dress looks homemade at all! 😉
Can’t wait for more DIY Fridays!!! Such a good idea!
So excited for DIY Fridays and even more excited for video tutorials!!
Amazing!! I would love to attempt one! I’m so excited for DIY Fridays, and I like this way of showing tutorials much better!! Thank you!!
How did the pins not make permanent holes? I always heard that when working with leather, you need to use binder clips or something.
I actually had no problems with permanent holes in the leather! Maybe test on a swatch before you pin just in case 🙂
Looks fabulous! You’re ROCKING this look.
For pressing the seams out, I’ve found the best way possible is to open the seam and glue the seam allowance down. Wet the back side slightly with a damp sponge and use a rubber mallet (my fave being the one from Home Depot for $5) to ‘press’ the seams. It’s kind of satisfying. 😉
Great tip! Thanks for sharing!
This is absolutely amazing! Great job and keep the diy Fridays coming — you’re an inspiration!
Oh my gosh – I simply can’t believe you made this! Such talent. I wish I could be clever enough to whip this up.
xoxo
http://www.whitneytakesawalk.com
I love most everything you wear but, I do not like this dress. It looks stiff and very uncomfortable. Is it?
It looks like an dress that a cartoon character would wear. You are a very talented seamstress and I can’t wait to see what you make next.
Ha, a cartoon character! That cracks me up. It’s certainly more stiff than any other dress I own, but once it’s on it’s SURPRISINGLY comfortable! Easy to move around it, lift my arms, bend over, etc. Definitely not the most practical dress for my lifestyle, so who knows how much I’ll actually wear it, but it was more about the challenge for me! 🙂
Merrick this dress is amazing! I’d like everything you make in my size please!
Oh Erin, you’re the sweetest 🙂
You are seriously so amazing!!
You need to make clothes for the rest of us!
xoxo, Kali
Thank you! And hopefully one day!! 🙂
Merrick you are so talented! I wish you could be my personal seamstress!
Thank you!! Sorry that I can’t be your personal seamstress! 😉
You are so good at it! This dress is lovely !
Thank you so much, Marie!
That dress is gorgeous!!
The Style Storm
<3, Christina
This is brilliant! So excited for DIY Fridays, I love your tutorials! Could I request a tutorial on how to create a sleeve block / how to trace a sleeve for attachment to sleeveless dresses? I know how to sew a sleeve onto a dress, but am just lost when it comes to drafting one!
OMG! I love this!!! so excited for more DIY’s i just bought a new sewing machine to do minor stuff, but i was just thinking to myself I could TOTALLY make more clothes than i do! I LOVE THIS! I am totally going to try it, thanks for the inspiration!!!
xx
Justine
http://www.sobeanie.com
Wow! this turned out incredible! Thank you for sharing.
ooooo loving this tutorial 😉
The photo of you looking over your shoulder in front of the flowers is a gorgeous. Awesome for tackling leather!