
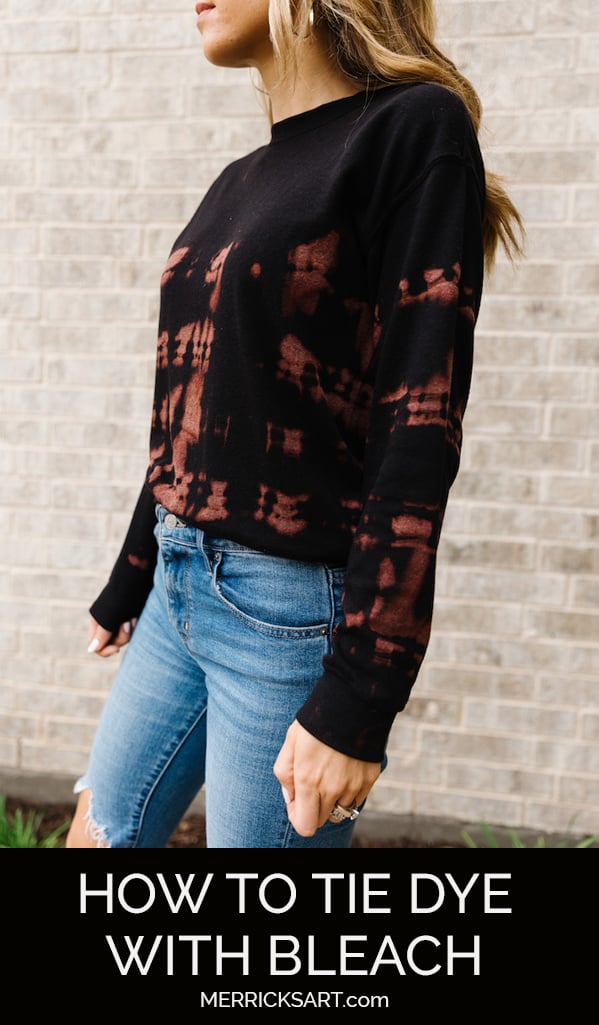
Bleach tie dye is a huge trend right now, and it’s so easy to do! This reverse technique uses the bleach to create a cool effect. Check out how to tie dye with bleach to transform your clothes.
Bleach tie dye is an easy way to add some fun to your wardrobe
I’m so excited for today’s DIY project — it’s an easy, beginner tutorial teaching you how to bleach tie dye your clothes.
I’ve been itching to do a new project while we’re in quarantine, but since I can’t go to the fabric store to get fabric, I decided to give bleach tie dye a try with a black sweatshirt I already own and bleach from my cleaning supplies cupboard.
All you need are some materials you have at home
You can probably do this DIY with things already in your house too. Try it out!


Here are the materials you’ll need for this bleach tie dye project
- colored item of clothing (I used THIS INEXPENSIVE SWEATSHIRT – wearing size small)
- bleach
- water
- squirt bottle (something like this)
- rubber bands
- protective gloves (dishwashing gloves are fine)


Here’s how to bleach tie dye a sweatshirt
Step 1. Get your item of clothing wet. Not dripping, but you want it to be damp. The fabric will absorb the bleach better this way.
Step 2. Determine the bleach tie dye pattern you want on your clothing. I wanted mine to be striped, so I roughly accordion-scrunched mine in the direction of the stripe until the body of the sweatshirt was a long tube. I did the sleeves separately, and accordion-scrunched those individually. I show you a few other options in the video.
Step 3. Place rubber bands around your clothing to secure the folds or twists. For the stripes, I did pairs of two rubber bands about half a centimeter apart down the shirt. This created the thin stripes. If you’re doing stripes, make sure they’re the same distance apart all the way down your shirt.
Step 4. Fill your squirt bottle with equal parts water and bleach. Don’t use straight bleach — it can eat away at the fabric! Make sure you use your gloves here to protect your hands.
Step 5. Carefully squirt the bleach mixture in between each pair of rubber bands. Make sure you turn your shirt so you get all sides of the shirt.
Step 6. Once you’ve bleached all the stripes, let the shirt sit for 10-20 minutes, letting the bleach lighten the fabric. Check it often, because the color will lift at different rates for different fabric and color. If you leave it for too long it can eat away the fabric too. I did about 15 minutes.
Step 7. Toss the entire shirt under running water and rinse out all the bleach, then squeeze it dry. The bleach won’t spread with the rinsing, so don’t stress about that. Then remove the rubber bands and open up your shirt.
Step 8. Let it dry completely (either in the sun or in the dryer). Wash at least once separately before adding it to your normal load.
Check out this video to make a bleach tie dyed shirt!
I made a little video on my YouTube channel to show you how easy it is to make this bleach tie dyed sweatshirt. Watch it right HERE!
IF YOU LIKED THIS POST, YOU MIGHT ALSO LIKE THESE POSTS:
-
Easy heart cut-out sweatshirt (beginner project)
-
Easy tassle hem swimsuit coverup dress (beginner project
-
Details of our black and white laundry room
photos by Aubrey Stock
Shop this Post


Thanks for the cute idea. There are small fabric stores online still selling fabric. Just a thought.
Just did this on an old Nasa hoodie and it TuRned out way better than the pictures. I mEssed up at first by not dampening it but instead spRayed it with a lot extra bleach watEr and it turned out store quality
Love this! Do you know what would happen if I soak a black hoodie in bleach for a little bit? Does it turn grey? Orange? is there any way of knowing what light color it would turn?
Reading about the very small things that are making you happy has made me envy you. One needs to click edubirdie.org/edubirdie-legit source to read reviews about edubirdie. You are keeping your entire family happy with these small tasks. I would be doing the same to keep my family happy.
[…] Bleaching the shirts is trending everywhere to get the tie-dye patterns on the shirts. Ideally, you don’t need to use the complete kit for this purpose. indeed, it would be the best project to transform your clothes like a pro. You can also use this bleaching method for the new shirts according to your choice and needs. To complete this craft, you will need to include an inexpensive sweatshirt, rubber bands, squirt bottles, water, bleach, and protective gloves. Make sure to dampen the shirt before bleaching. merricksart […]
[…] Just like the tie-dye, the beach tie-dye is also becoming a hot trend and helps make outstanding outfits for your fashion closets. This t-shirt will get ten out of ten from you in terms of fashion and is a crazy reverse tie-dye creation. No matter even if you are a beginner, you can easily do this t-shirt tie-dye project, and it will surely help update your wardrobe. You need colored items of clothing, bleach, water, squirt bottle, rubber bands and protective gloves to easily duplicate this designer-style bleach tie-dye t-shirt. The entire project will also go super easy on your wallet. merricksart […]
[…] A super cool effect is created in regular tie-dyed projects by using bleach. Transform your clothes into something new and amazing through the bleach tie-dye method. It is quite an easy way to add some fun to your wardrobe. You need supplies like colored items of clothing, beach, water, squirt bottle, rubber bands and protective gloves (dishwashing gloves can also be used). Start by getting your clothing wet but not dripping wet. merricksart […]