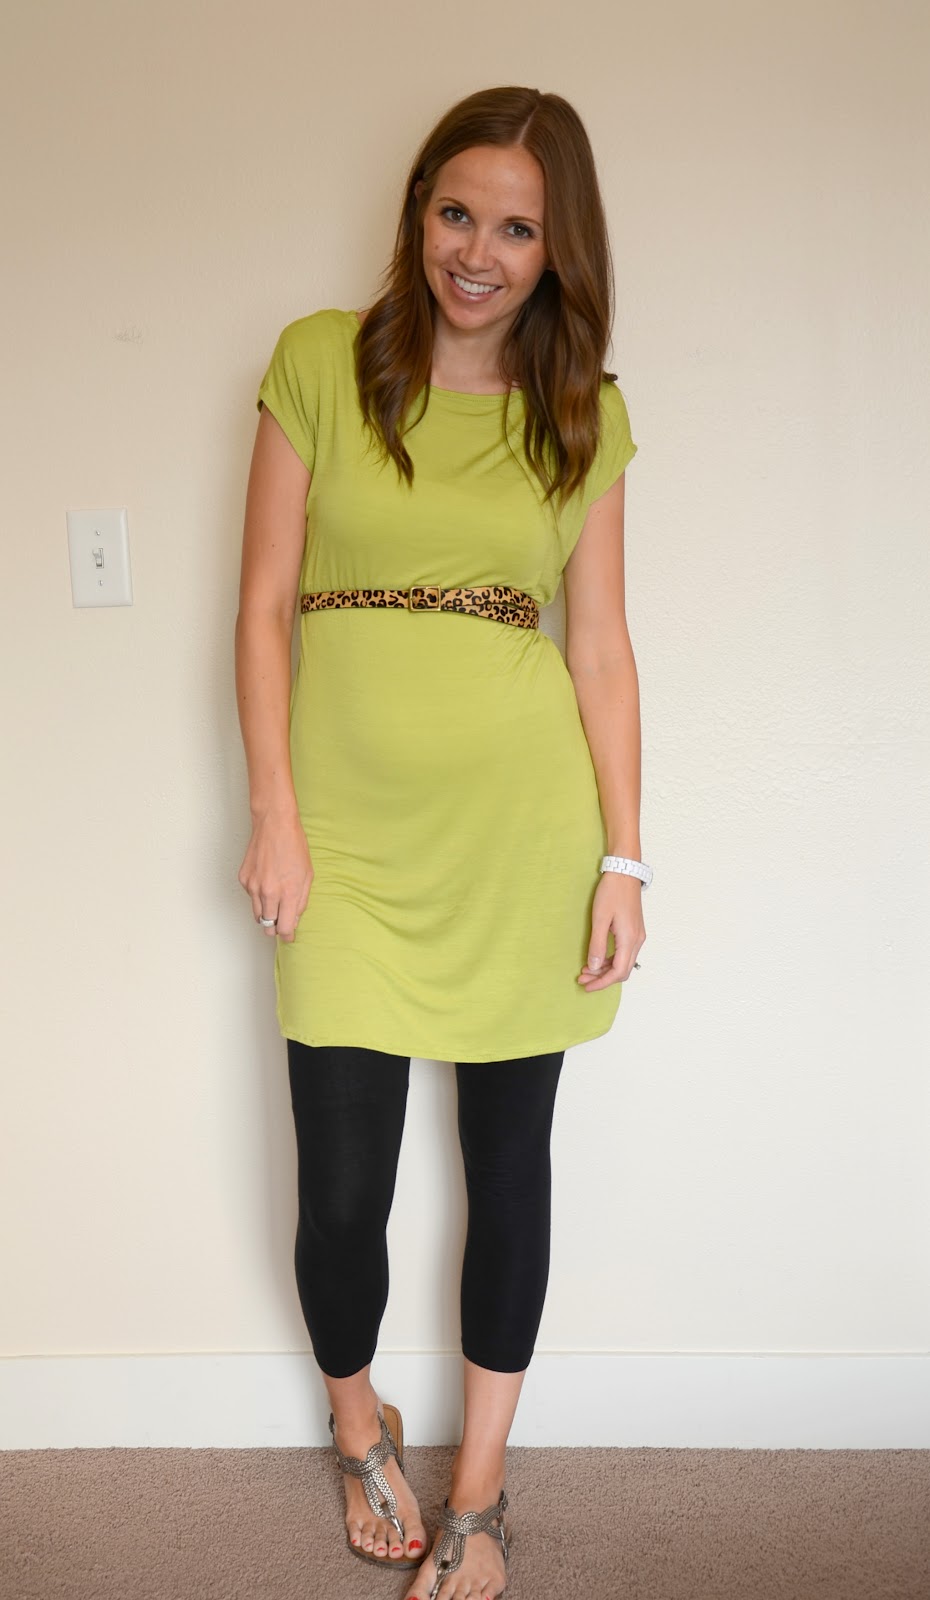
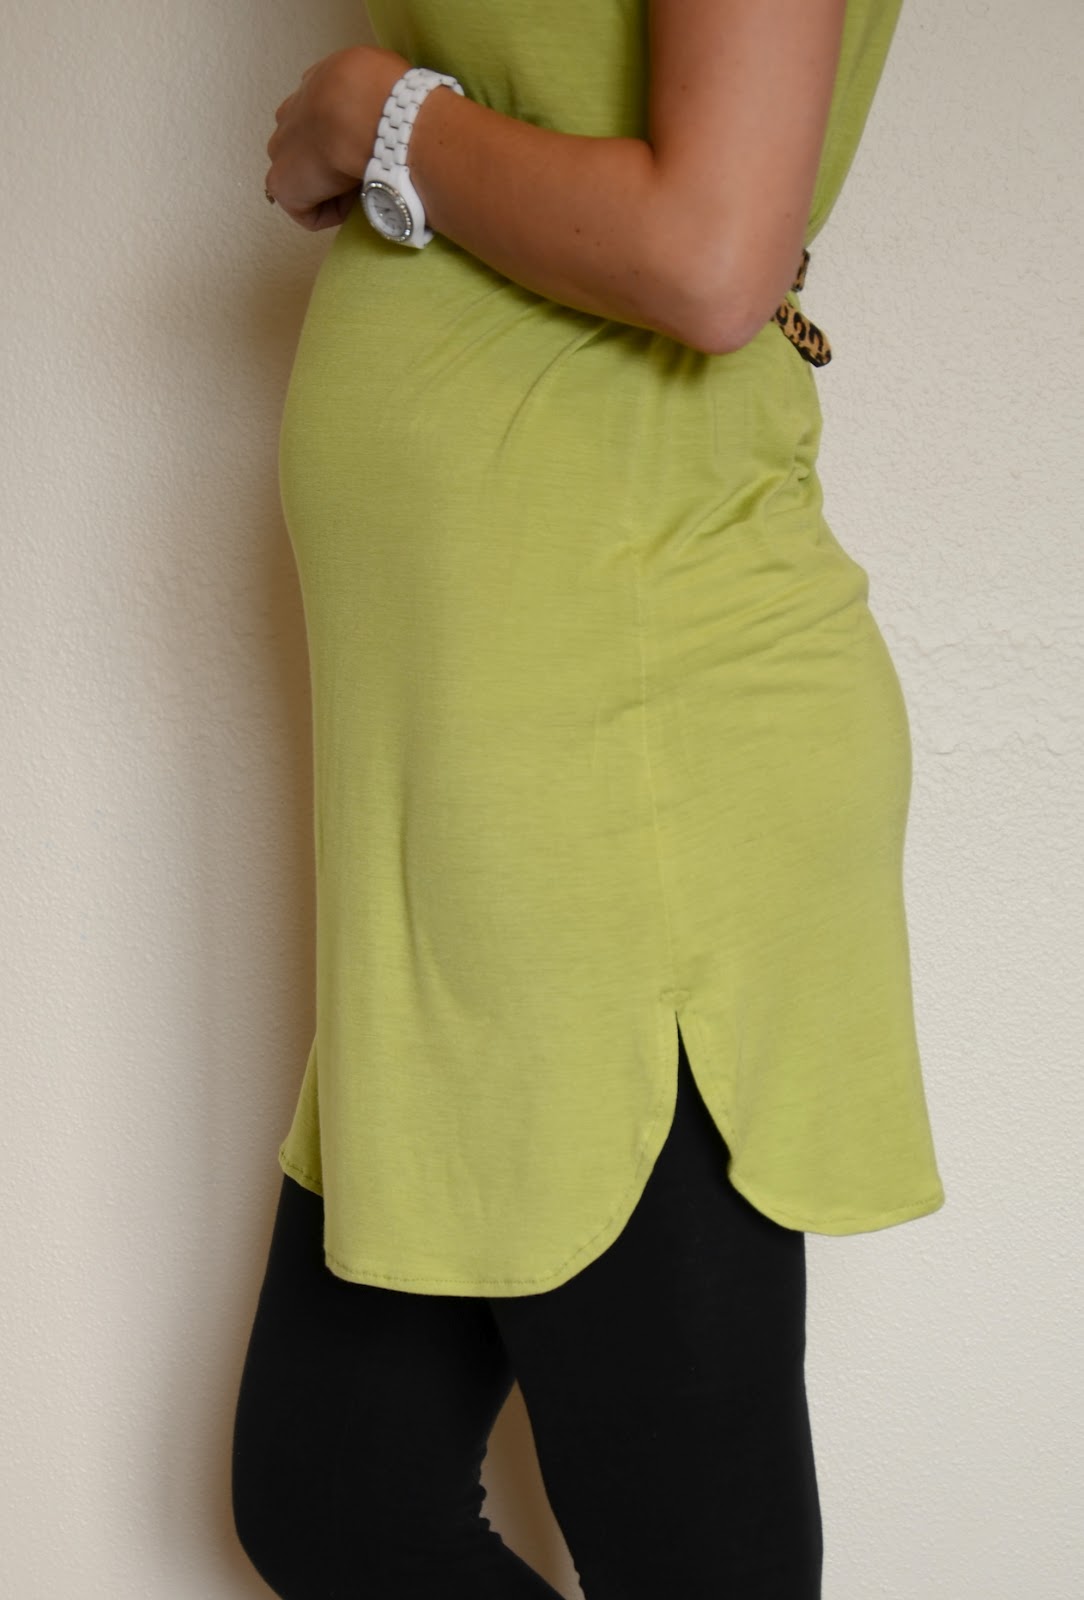
A few days ago, I ran across this dress on pinterest. I was instantly drawn to the side tulip style (for lack of a better term) hemline, so with some of my new fabric, I threw together another lightweight summer tunic with this type of hemline.

It’s basically the same tunic that I made here, but I added a bit of length, and obviously did the tulip-style hemline. I love how it turned out. The little hemline detail just adds a bit of unexpected visual interest and makes it a step above a standard tunic.
Materials:
- 1 yard of jersey knit material (more or less depending on your size and your desired hemline length)
- matching thread
- shirt or tunic to use as a pattern
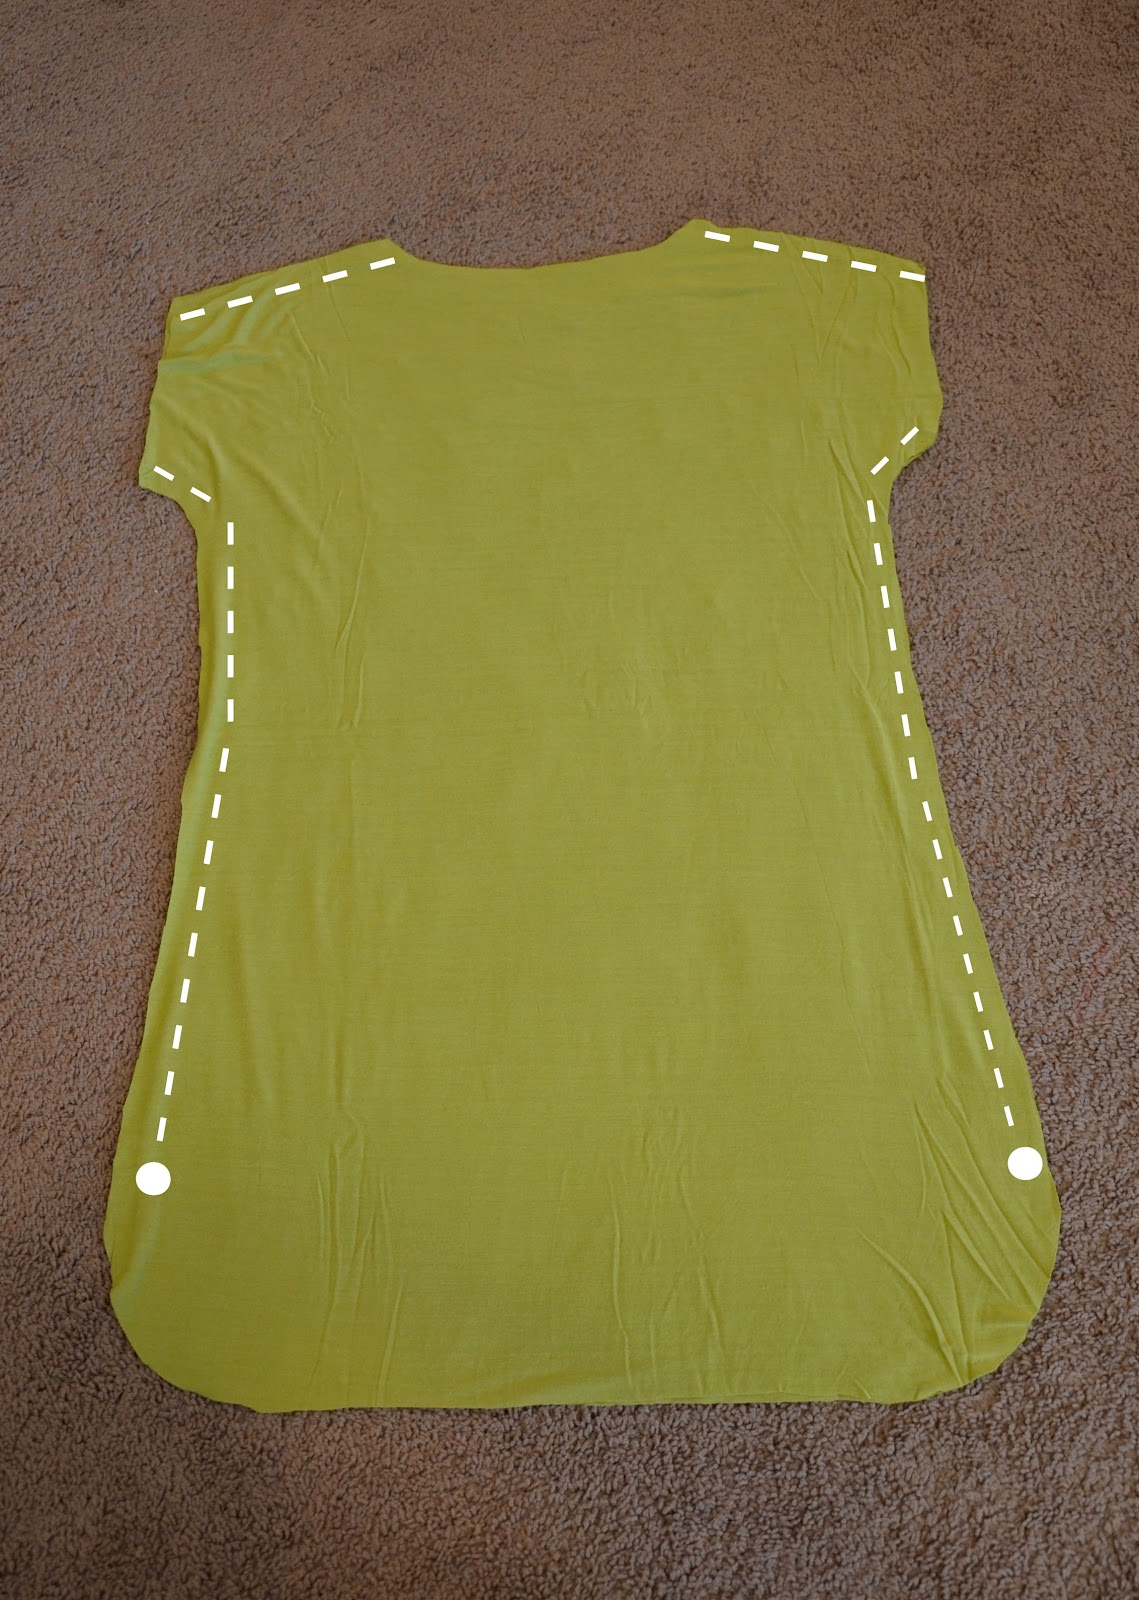
Step 1. Using a shirt or tunic as a pattern, cut out your tunic with a 1/2″ seam allowance, as seen below.
*Make sure that you lay your “pattern shirt” along the grainline of the fabric (the directional weave lines of the fabric). When you get a cut of fabric, the top edge is not necessarily even with the grainline, so make sure you’re lining up your “pattern shirt” with those lines, not the top edge of your fabric. Otherwise it will hang weird when you wear it and wash it.

Step 2. Cut your hemline to the desired length and then round the edges, as seen below. Once your hemline is cut, fold your fabric in half to make sure your tunic is perfectly even. Trim if necessary.

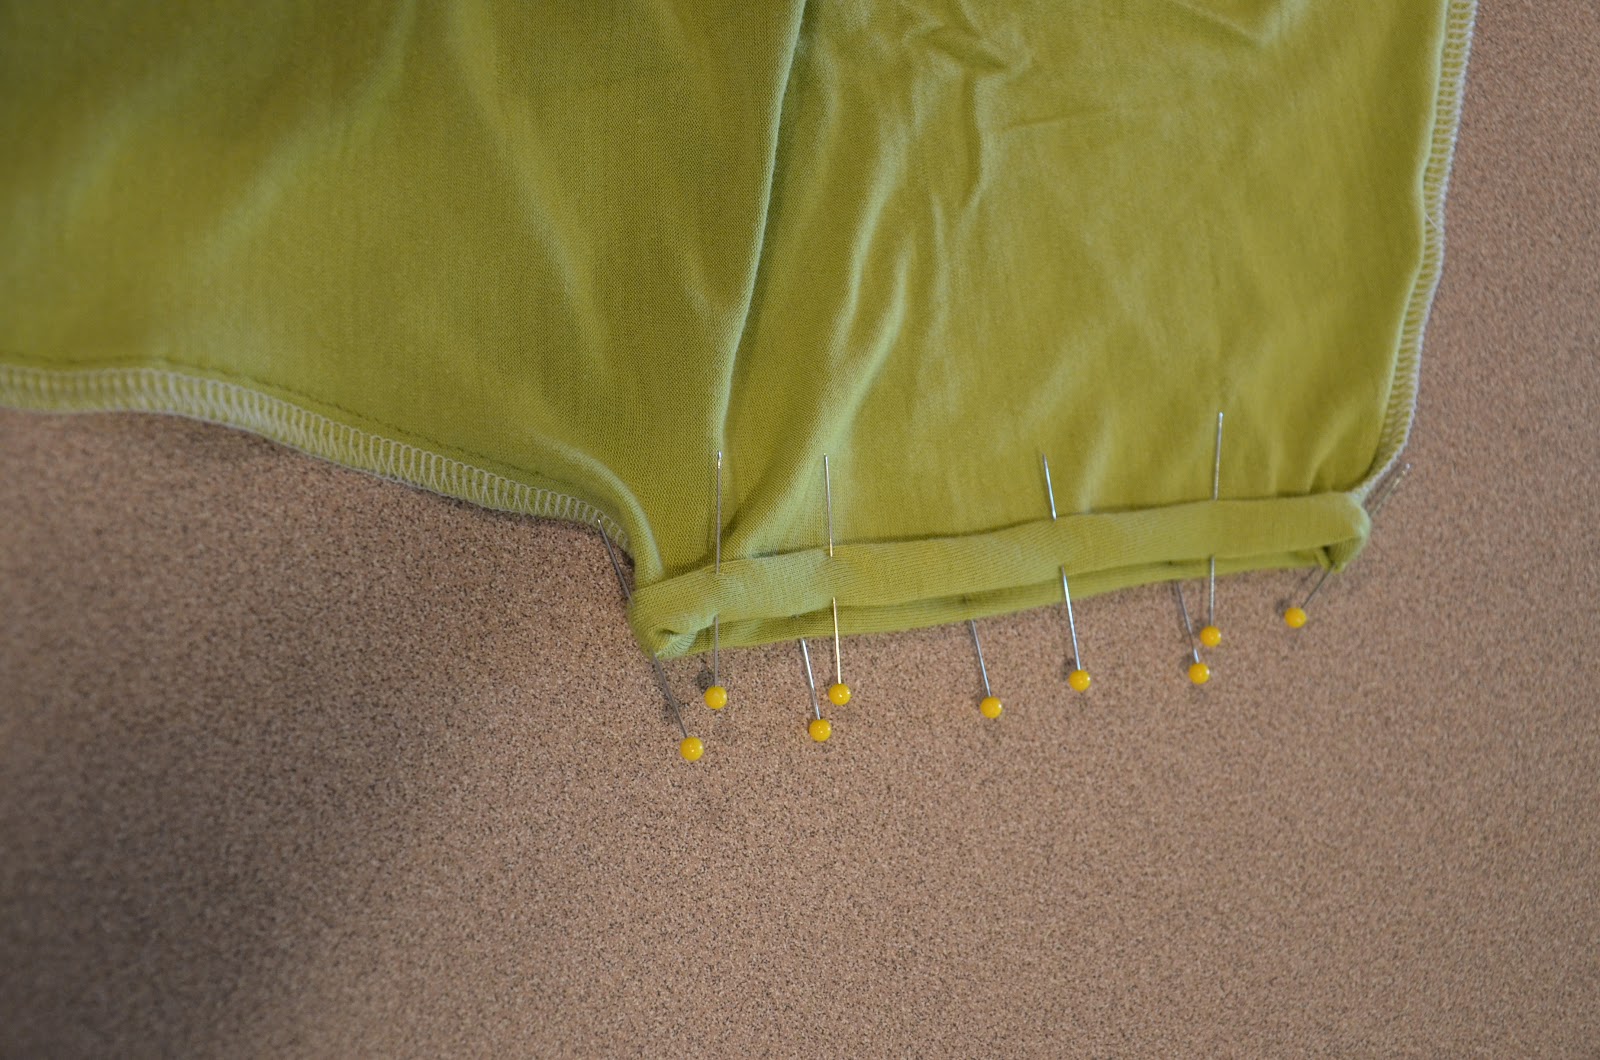
Step 3. Sew up the shoulders. Then sew up the sides, stopping right before you get to the curve of the hemline, as seen below. Trim and serge or zigzag the raw edges, if desired (if you trim your sides, make sure you don’t trim below the white dot (as seen below) since you’ll need that extra seam allowance for your hemline).
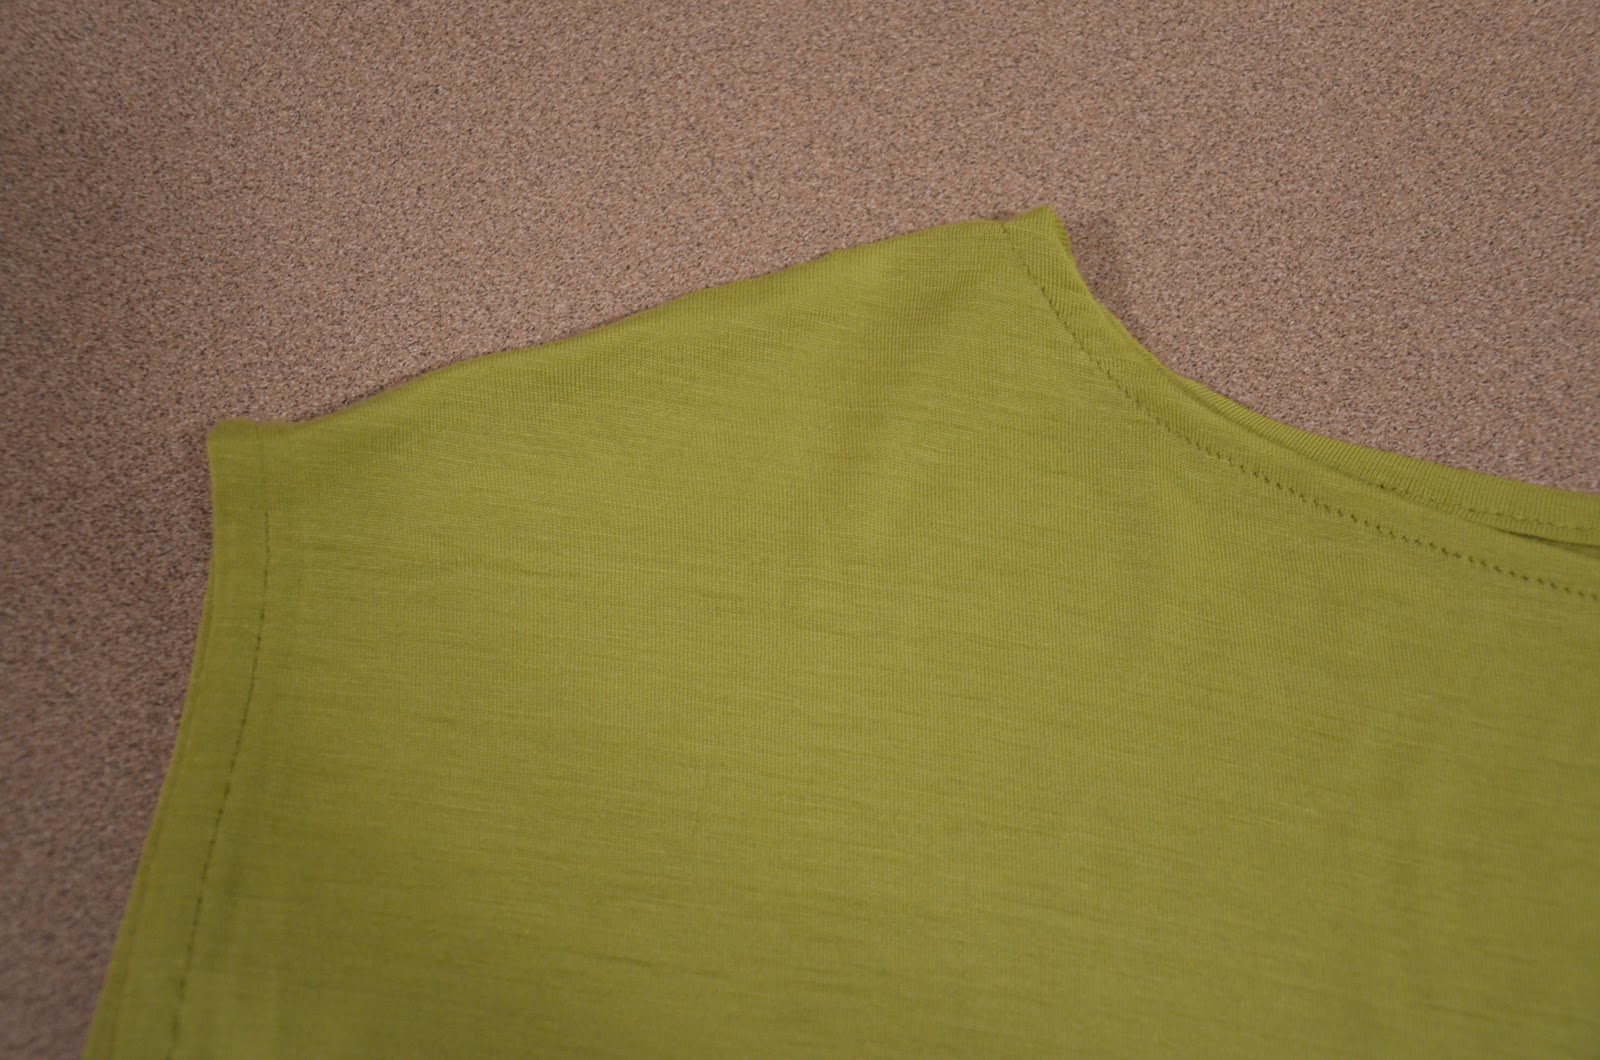
Step 4. Fold the armholes over twice, pin, and sew around the opening with a wide straight stitch. Do the same for the neckline. Press.
Your neckline and armholes should now look like this:
Step 5. Now for the hemline — this will take some time, but go slowly and carefully so you don’t have to do it twice.
Fold over the hemline twice, carefully pinning the curved sides. Those curves got a bit bunchy for me, so there were some little tucks and folds on the inside of the hemline when I sewed, but as long as the fabric is smooth and straight on the right side of the fabric, you’re good as far as I’m concerned.
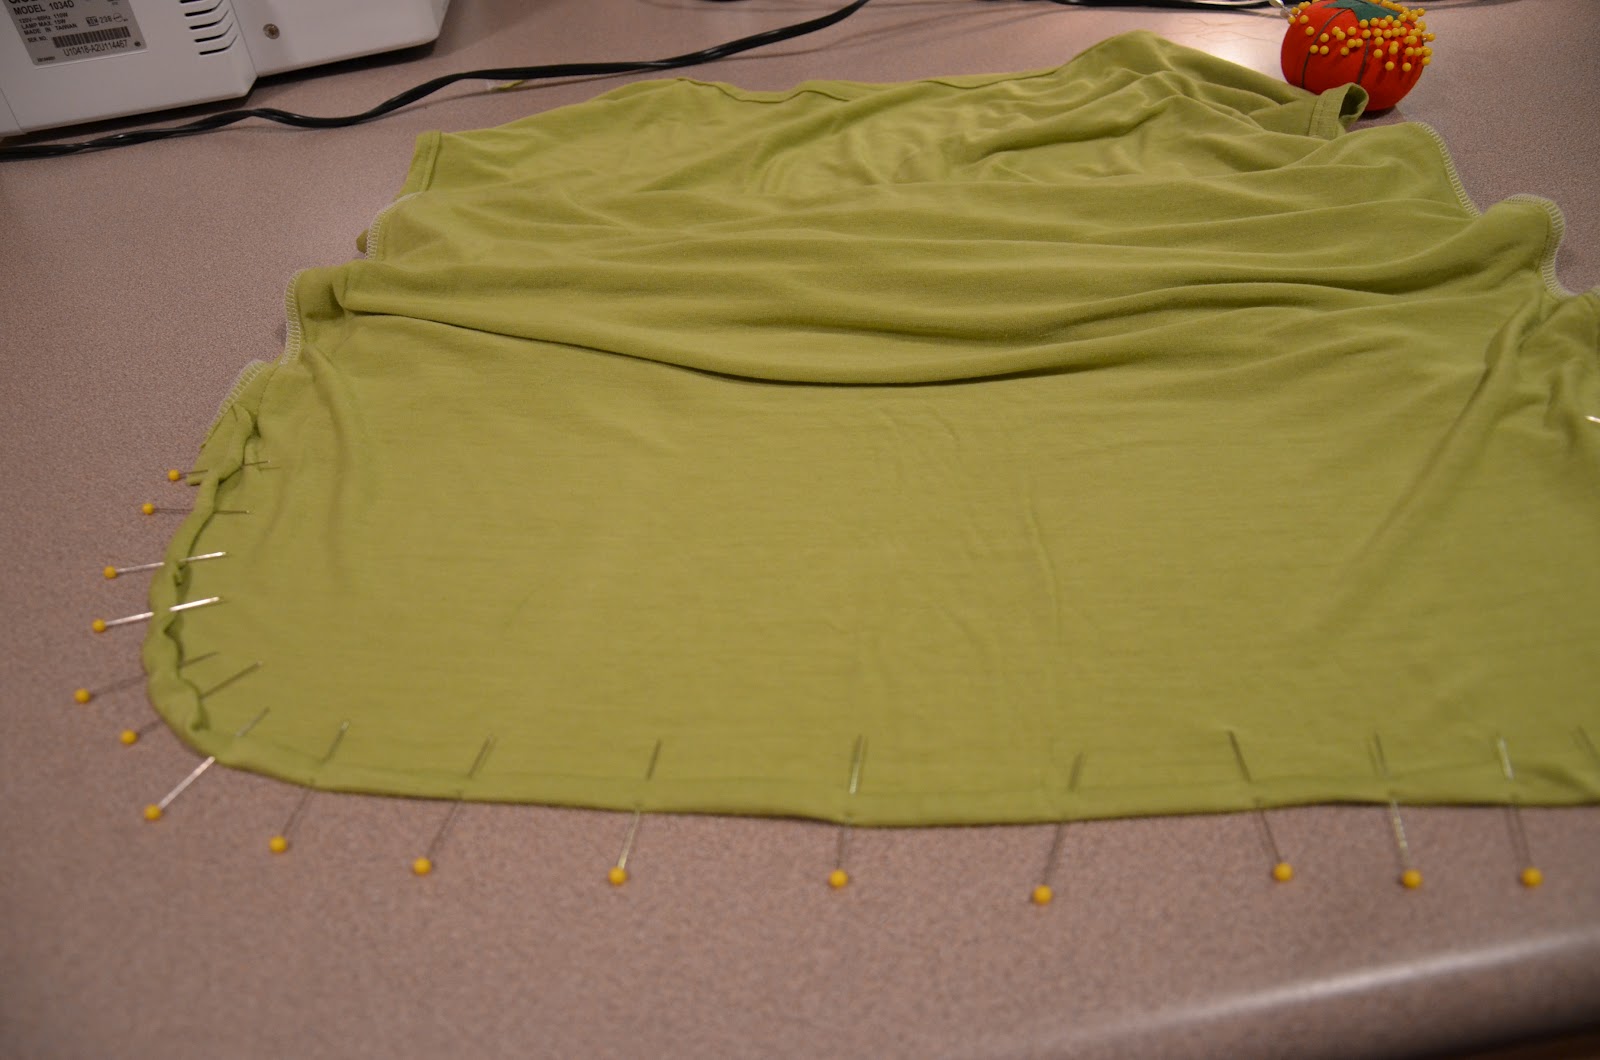
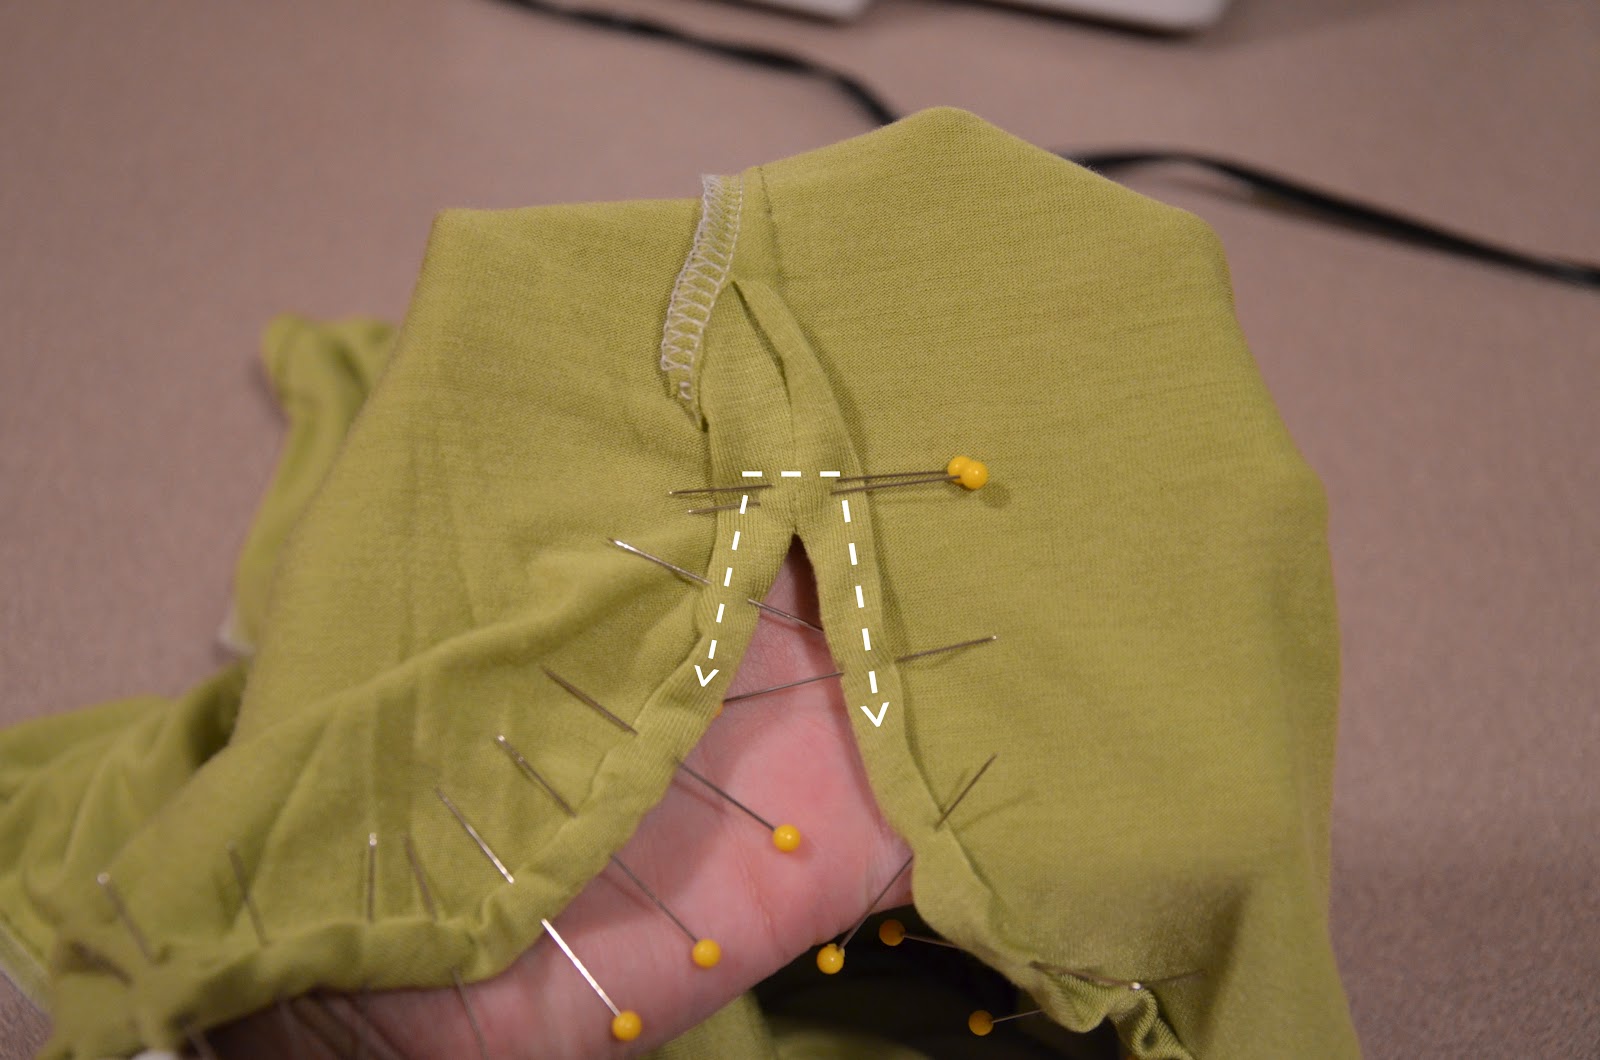
For the sides of the hemline, use the extra seam allowance that you didn’t trim, and fold twice from there (you might have to cut into your zizagged or serged seam allowance a centimeter or two, like I did).
Once everything is pinned in place, sew around the entire hemline along the folded edge with a wide straight stitch. When you get to the sides, sew up and across the side seam allowances, as shown below with the white dashes.
*With thin stretchy fabric like this, I have to use a lot of pins to keep things in place, but when I start sewing close to the pins, the fabric can slide and wiggle around a bit, causing my stitching to go crooked. To avoid this, don’t sew over the pins, and don’t sew too near them. Pull them out when you get within about a centimeter of them and you should be good.
Press, and you’re done!
 |
As always, comment or email me with any questions! Happy Sewing!


this is such a cute top – if I could sew I would totally make this!!
http://allthingsprettyandlittle.blogspot.com/
Cute cute shirt. Knits are hard for me but this looks worth a try. Thanks for sharing.
Ur awesome! Just discovered ur blog through pinterest and i am already addicted! So many beautiful things! 🙂
Love it! The color looks great on you also : )
Another great pin! =) xoxo
It looks extra cute with that little baby bump sticking out! Love it!
Love this! Looks so cute and comfy! Nice for a growing bump!
Gorgeous! Love the color on you!
Just stumbled across your blog…I think it's a new favorite! 🙂
SO cute!
very cool!!! and i love the colour
What a cute summer outfit!
This is so cute and you look absolutely beautiful in it! Definitely putting this on my to do list 🙂
I've been looking for a t-shirt dress tutorial and I think I'm definitely going to have to give this a go!
PS – your bump is adorable 🙂
this is so cute. you are so good! whenever I get my sewing machine out it sits on my table for days and my materials pile up beside it and I don't do anything! Then after a week or two of making my poor family eat dinner on the floor (picnic!) I finally just pack it all up and put it back in the closet.
Love the hemline on this tunic but I am sure this would make me look pregnant even though I am not. Hard to hide my post-4-kids tummy in this type of top 😛 Love it though!!!
I'd bet that you could make some pretty cool Halloween costumes. I wish I was crafty! (I think I say that in every one of your sewing tutorials. lol)
http://www.daisyraeboutique.com
http://www.kacieskloset.blogspot.com
Very Cute!…..On you! Wouldn't work on me. You're so talented!
Hello, my name is Rachel. I have recently started following your blog… Thanks for all the great tips! I really enjoy them 🙂 I have 2 boys, so whenever you post about your son I can totally relate! Keep up the good work!
I love this. I'm trying to debate on whether to make it with some hot pink jersey fabric I bought a while back on sale. (I'm a red head.)
http://domesticatedworkingwoman.blogspot.com
Found your site through pinterest. I wish I could sew. You should start an Etsy shop and sell your designs. Maybe you do – I'll have to check. I'm pregnant – I have a small chest – and big hips and behind so I really struggle to find stuff I feel good in. I'll keep following your blog! Thanks!
I love all of your clothes! When they are hand sewn or sewn with our machines at home, are they more delicate to wash?
Heather Rose:
Yes, they can be more delicate to wash. The type of fabric you use will also make a different, obviously.
I haven't ever hand washed the things I make, but I have washed them on delicate cycles, or in smaller loads, or line dried them.
Good luck!
thanks for sharing.
I just tried making this. I love how yours looks, but I think the jersey that I used was a little too heavy, with not enough give. It ended up being way too small. My mistake. Going to get back on the horse and try again! I'd love to have just a few of these to wear under a cardigan with some boots this fall. Thanks for posting this! All of your handmade items are so lovely!
Abi
http://www.eliandellie.com
Hi! If you cut notches out of the rounded corners, you won't encounter that bunching. 🙂 The bunching is because there's too much fabric in too little area. Notch before you fold it under…it should work!
Hi! Love the dress! I am currently 5 months pregnant and looking for maternity clothes once my belly gets bigger. Any advice on how to adjust this to accommodate a bigger baby bump? Thanks!
If you make sure the stretch of the fabric goes across your belly, it should accomodate a bigger bump as you grow. You can also put some elastic along the sides to create a ruched center, like most maternity tops. Hope that helps!
Your tutorial is clear and well explained, and any questions I Had wEre answered in your pictures. I am looking forward to exploring your site. Thank you!