


 |
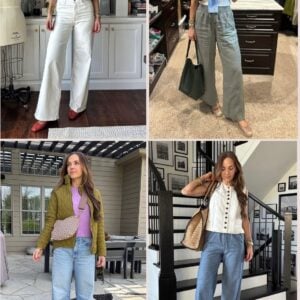
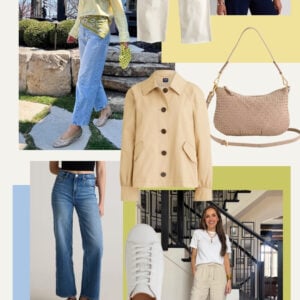
| romper: made by me // swimsuit: j.crew // sunglasses: c/o sunglasses shop // sandals: target (similar) // hat: target |
Materials:
- 1 1/2 yards (roughly) of thin stretchy knit
- matching thread
- elastic (optional)

Using a loose fitting tank (or a tank with a loose sweater, like my ridiculous combo below) as a pattern and cut the tank portion of your romper, adding a half inch seam allowance. CUT TWO OF THESE.


Step 2. Take one of your SHORTS pieces and with right sides together, sew up the inseam, as seen below. Repeat with second SHORTS piece.

Step 3. With right sides together, pin and sew the two shorts pieces together from the front to the back, matching up the inseams at the crotch, as seen below.

You shorts will now look like this.

Step 4. With right sides together, sew the front and back TANK pieces together at the shoulders, then sew up the sides.

You should now have your TANK and SHORTS pieces all sewn together, as seen below.

Step 5. Fold the neckline of your tank over two times and pin into place. Then sew around the entire neckline with a straight wide stitch.

Now sew the arm holes, folding the edge over two times, pinning, and then sewing with a straight stitch, just like the neckline.

Step 6. With right sides together, put the SHORTS inside the TANK (as seen below) and sew them together with a straight stitch. My TANK was slightly wider than my SHORTS so I just stretched as I went to avoid bunching.
I planned to put elastic in the waist (like I did in this tutorial), but my fabric was stretchy enough, and my straight stitch allows some stretch since I pulled it as I sewed, so no elastic was needed. But add some to your waistband if needed.
Step 7. Determine your desired shorts length and then hem with a wide straight double stitch.


[sunglasses shop sent me these sunglasses for review. I was not paid for this post and all opinions are my own].


Looks great! I was just thinking about making a romper….granted my idea was for my daughter. I'll have to give one for myself a try too! Thanks for the tutorial.
omg this looks so cute! And it seems easy to make. 😀 thanks for this.
xx Stephanie (www.stephaniesstyleblog.blogspot.com)
You are truly amazing.. I soo want to soo things together just like you do.. See I love how you will just cut free handed without a pattern… that is my idea of sewing.. I promise I would looove to try and "Dupe" this outfit.. Im just scared.. my mom was a semstress.. and she passed away last year. I got her serger and sewing machine and swore I woud learn to sew.. needless to say im too scared and havent sewn NOTHING!! LOL.. I know… i need help.. lol.. love your sewing ideas.. keep them coming!!
Looks great ! Can't believe you made it yourself
Madeline | Its a Mads Mads World
Adorable! You are one talented lady! I love it with the cute sun hat!
Katie (http://whatsupwiththebuells.blogspot.com/)
Hi! This may be a silly question… but how do you sew your double seam at the end? Is it just two straight seams that you sew one after another or is there something more?
Thank you!!
No, not a silly question! I use a double needle. I picked mine up at Jo-Ann's for a few bucks (with my 40% off one item coupon, of course!)
You use it just like a regular needle, just thread your machine twice with two spools of thread and then thread one through one needle and one through the other. Super simple. Also, the double stitch allows a little bit of stretch, which is helpful for hemlines on stretchy knits.
Good luck!
I broke my double needle the first time I used it. Bummer, right? I ended up doing two straight seams 1/4 inch apart. Doable, but only with a steady hand.
Just curious… how do you get in and out of it?
Through the neckline. I mention in the tutorial that you need to cut the neckline big enough to allow this (or add a keyhole and button closure in the back!)
Aww this is super cute!! Perfect for the hot summer.
Kristina does the Internets
So cute! I'm a Ray Ban wearer (I actually get a headache from a lot of lenses, so they work for me for that reason). I'm glad you made the jump! Gotta have a good pair of sunglasses!
I love it! You look great in it.
I really want to go make this right now. You look like a model!
Love the hat! Did I miss the announcement? Who won the Sephora prize?
WOW! I can't wait to try this one out! I didn't think it was that easy! Thank you!!!
This is seriously very impressive. I need to try this out asap!
Best, x http://chictrends.co.uk/
Thank you! I've been wanting a romper so bad…
Geez you make the looks so easy that I want to try. I haven't sew hardly at all though so I don't know if this would be best for me to start with.
And is that signs of a serger?
You should totally make this! I feel like it has you written all over it!
http://www.cichic.com/white-sequin-v-neck-short-sleeve-skinny-cotton-dress.html#product_tabs_description_tabbed_contents
– Katie (http://www.whatsupwiththebuells.blogspot.com/)
looove it !
You are so talented! I always want to make things like this….and the end result never looks even close! haha!
Cute!! and this tutorial makes it look so easy to make.
Such a creative activity taht you have done .I really like it.
http://www.apparelnbags.com/womens-tanks-and-camis.htm
Very sweet romper! I love the colors!
cuuuuute! what kind o fabric did you use for this?
I don't know what the exact type of fabric is, but it's a super thin knit. It's almost like a soft mesh material…I purchased it at a shop in the fabric district in LA!
Even with the steop-by-step, there is no way I could make that! You are amazing!
-AJ
FitTravelerAJ.com
this is great! Can't wait to try it…Thanks for being so creative and to share it with us…and to make me discover new resources.
http://www.apparelnbags.com/womens-tanks-and-camis.htm
Looks awesome 🙂
so cute! just confused for the middle, you did sew it together, right? and does it stretch well? thanks!
http://thelollyprojectblog.blogspot.com
[…] by Merricksart […]
[…] by Merricksart […]