

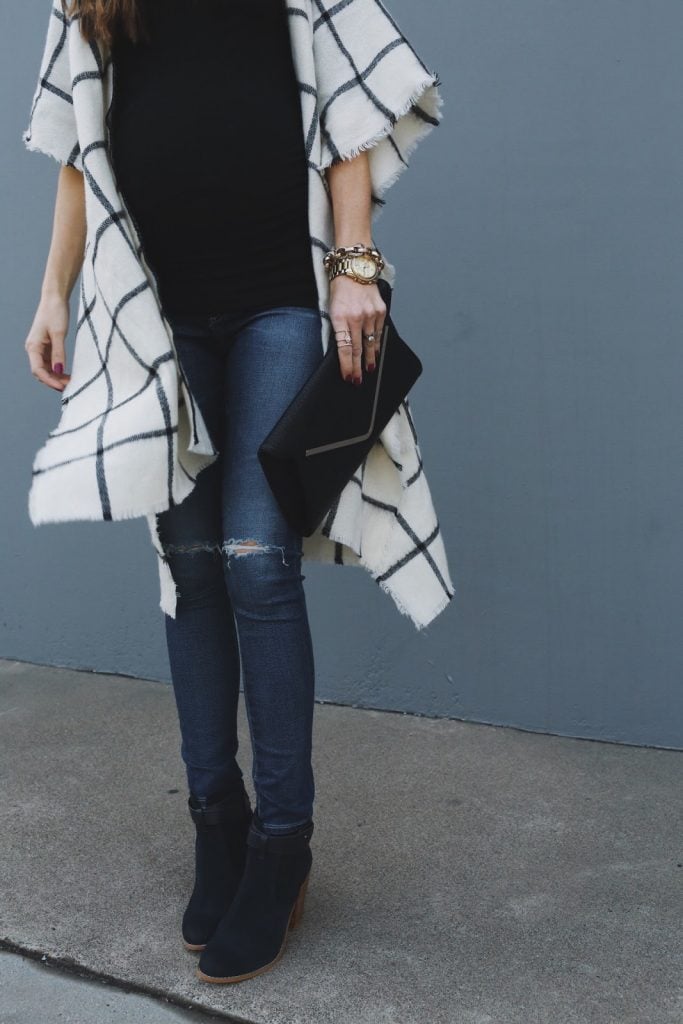


CAPE: MADE BY ME (TUTORAIL BELOW) || MATERNITY TEE || JEANS c/o PEA IN THE POD MATERNITY || BOOTS c/o SOLE SOCIETY || SUNGLASSES || SIMILAR CLUTCH || RING c/o SOLE SOCIETY || MICHAEL KORS WATCH
photos by rad and happy
Capes are huge this season, so of course I had to try my hand at making one. I have a bunch of oversized scarves in my drawer, and since they’re the perfect size for this kind of project I raided the drawer and used a plaid one from Old Navy. It’s not longer available, but this one looks like a good size and is such a pretty pattern.
This is such an easy refashion and you could whip it up in less than thirty minutes! Click READ MORE below to find the step by step instructions.
Here’s what you’ll need:
1 blanket scarf OR 2 yards fabric (a lightweight wool or flannel works great!)
matching thread
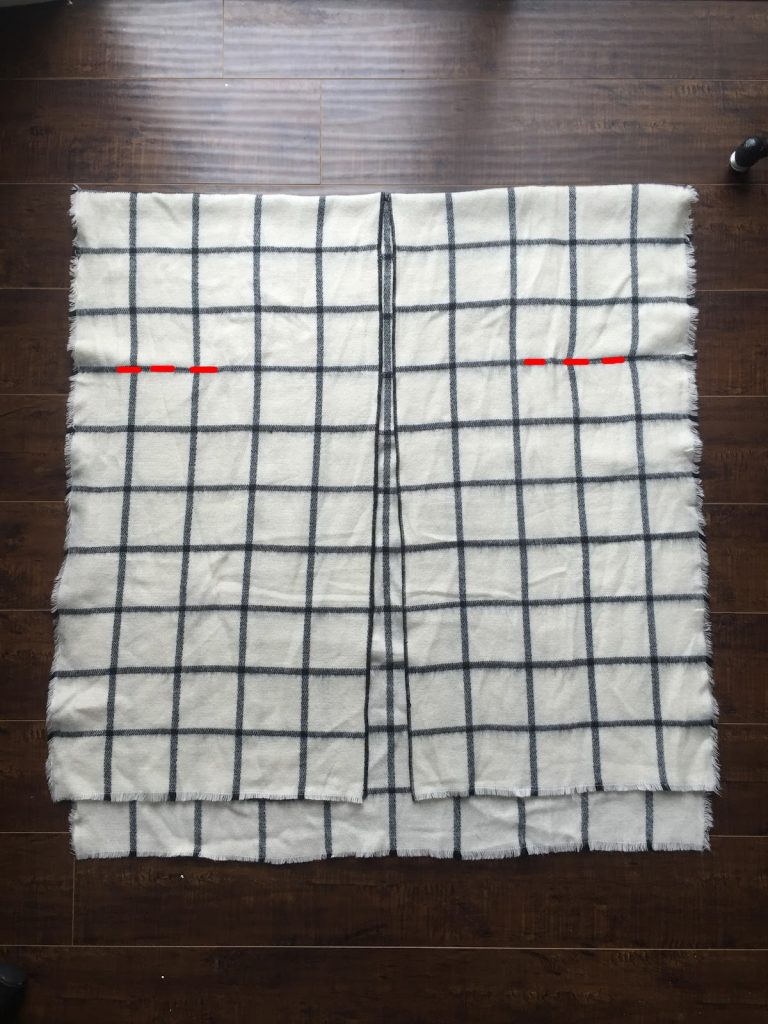
Step 1. Fold your fabric in half, lengthwise, as shown below.

Step 2. Cut down the middle from one end up to the folded edge.

Step 3. Serge or zigzag around the opening you just cut, then fold the edges under and hem around the entire opening.


Step 4. This last step is optional, but I like to add a few stitches to create sleeves so the cape hangs correctly and you’re not constantly adjusting. Sew 4-5” across each side (as shown in the image below) to create pseudo sleeves for your cape. [note: when I folded my cape in half to mark these sleeves, I didn’t fold it evenly, as you can see along the bottom. This creates a little less boxiness when you wear the cape, but is optional].
And that’s it — you’re done!


Ooh, I’ve been loving the sheer, lightweight capes coming up again for spring so I might have to keep my eye out for a large scarf I can use. Thanks for the tutorial!
http://practicallypaleo.co
This is SO CUTE! Thanks for the tutorial! I will definitely be making this as soon as I find an adorable scarf to do it with!
Oh gosh, my mom turned my red blanket scarf into cap in the same way, I love yours.
http://dressmecasual.blogspot.com.eg/
i have this same scarf! i may just have to give this a try! thanks for the tutorial.
katelyn
http://www.katelynryan.com
This looks like a super cute and easy D.I.Y! I’ll have to try this out!
Unique Geek
I probably should not be sharing this on your blog because I want to keep this boutique a secret for myself haha. It has very similar style clothing at reasonable prices. So ladies if you need cute, affordable clothing then you should check out http://www.dearannieboutique.com.
SO obsessed with this! Definitely will have to do this to a few of my scarfs!
http://www.bysophialee.com/
love this idea =o) i may have to do this with one of my old scarves
http://dreamofadventures.blogspot.com/
Love the way you wrote your tutorial. Super easy to follow!
And love the clutch too. That silver detailing is perfect.
coffeeslag
COFFEESLAG Winter Coat OOTD
Just found your website and I am obsessed! I’ve been sewing and designing for a long time and am just starting to bring it to my blog. It’s interesting to see how you do your training steps. I do have a question- what kind of serger do you own? My sewing machine has a stretch stitch, but it would be amazing to have a serger as well. Thanks !
-Stefanie
http://www.thestylesafari.com
I have this one: http://bit.ly/28OQ1eg. It’s on the low end of sergers, so it’s a great started one. I have had mine for almost five years and I’ve had no problems with it and I love it. Definitely recommend.
What are the dimensions at step 1? I have 2 yards but mine looks so wide compared to your picture. I have a different kind of fabric. I am trying to make this for a party coming up. I would really appreciate answer.
Your fabric might be 60 inches wide? This scarf was about 40 inches wide and about 72 inches long (folded in half). If yours is 60 inches wide, cut it down to about 40 inches so it’s not so big.
Does that help?
PLEASE-TELL me how far down from the shoulder do i make the seam fOr sleeves. Thanks