


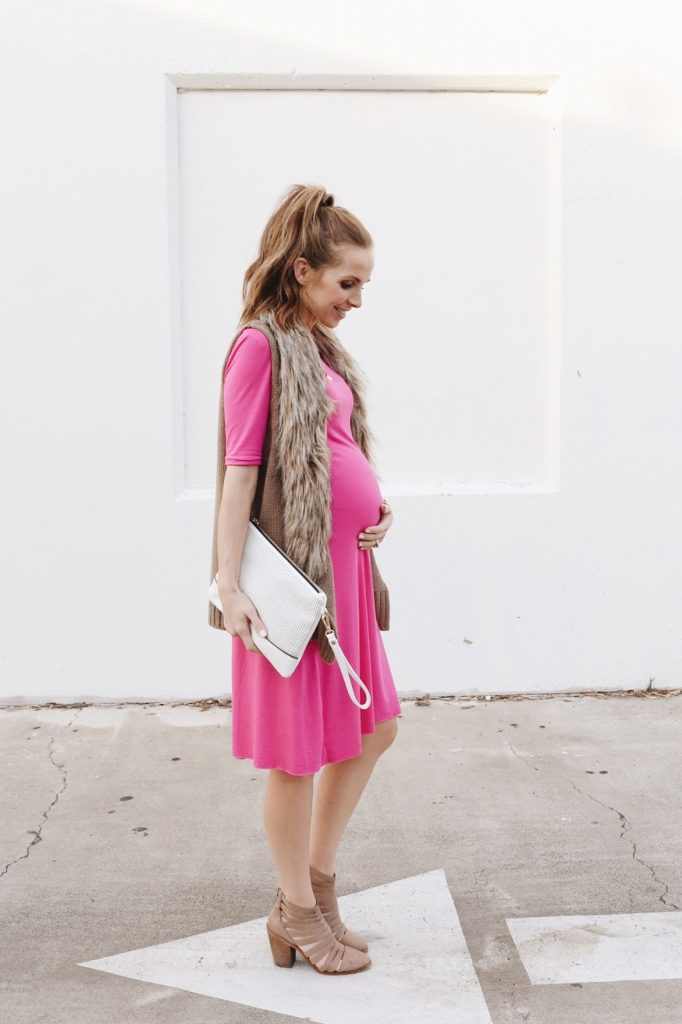
DRESS: MADE BY ME (TUTORIAL BELOW || FAUX FUR VEST (ALSO HERE) || SIMILAR ANKLE BOOTS || SIMILAR CLUTCH || SUNGLASSES
Valentine’s Day always sneaks up on me. After recovering from Christmas, I’m always so focused on getting back into a good routine and plowing through my resolutions that suddenly it’s February and I haven’t even thought of it. But you know how much I love celebrating holidays, so I’m trying to make a better effort to think about and prep for them early so I’m not rushing at the last minute.
One of my very favorite things is making myself something new for a holiday, so for the next few weeks on DIY Friday I’ll be sharing some fun clothing ideas that you can whip something up for yourself for Valentine’s Day, whether you’re staying in, going out, hanging with friends, or going on a hot date.
First up is this super easy swing dress. I’ve made myself a couple of these over the years, and even shared the tutorial two years ago, but I’m resurrecting it because it’s the perfect dress for maternity or non-maternity, and easy enough that any beginner seamstress can make one. It’s the kind of dress you can dress up with heels and a jacket, or down with sneakers and a hat. And they’re great for maternity, but also perfect for non-maternity.
Make yourself a pink one like me, or do it in red, or white (and throw on some pink shoes!)…lots of possibilities for V-Day!
Click READ MORE below to find the full tutorial!
Materials Needed:
2 yards lightweight knit fabric
matching thread
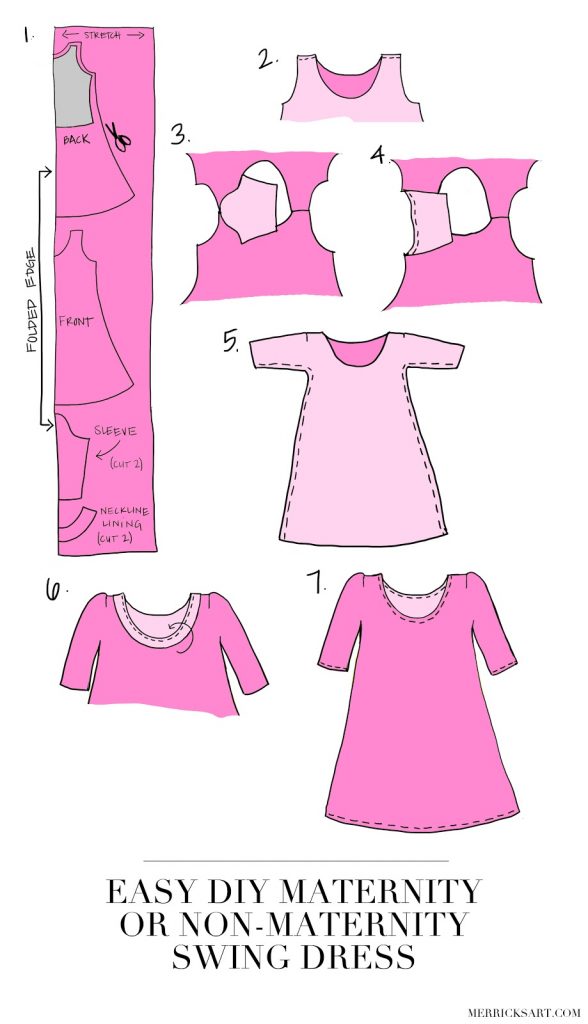
Step 1 // First let’s cut out all our pieces. You’ll need a BACK, FRONT, 2 SLEEVES and 2 NECKLINE lining pieces. Use a tank top or tank dress that you own, fold it in half, and then lay it flat on your fabric with the fold of the fabric matching up with the fold of your tank. Cut around it (adding a 1/2″ seam allowance), and then adding your desired length and a flared width (mine was 20″ across at the armpits, and 42″ at the hem for both FRONT and BACK pieces). Do the same for the FRONT piece, making the neckline lower on this one. Use a fitted 3/4 sleeve from a shirt that you own and use it as a guide to cut out the 2 SLEEVES, then use your FRONT and BACK pieces as guide to cut the correct widths of NECKLINE pieces.
[tip: if you don’t know how to make a pattern from your own clothing, use this video here].
Step 2 // With right sides together, pin the FRONT and BACK pieces together at the shoulders and sew together.
Step 3 // With right sides together, pin the top of the SLEEVE and the top of the shoulder together, as shown. Continue down the rest of the arm hole, pinning the sleeve in place.
Step 4 // Sew the sleeve to the arm hole with a 1/2″ seam allowance. Repeat steps 3 and 4 for the other sleeve.
Step 5 // With right sides together, sew from the elbow to the knee with a 1/2″ seam allowance. Make sure your seams match up at the armpit!
Step 6 // With right sides together, sew your NECKLINE pieces together to make a circle. Make sure this circle is slightly smaller than your dress neckline so it has to be stretched to fit around — trim if necessary before sewing the two NECKLINE pieces together.
Then, with right sides together, pin the NECKLINE circle the neckline of the dress, matching them up the shoulder seams and then stretching evenly so it fits around the neckline. Sew with a 1/2″ seam allowance around the entire neckline, stretching slightly as you sew so the pieces lay flat. Trim the seam allowance and then tuck the lining inside the dress and press flat.
Step 7 // Using a wide stitch and a double needle (for some stretch!) top stitch around the neckline to tack the lining in place. Then hem the sleeves (also with a double needle) and the dress to your desired length. [tip: for a more professional look, blind hem stitch the bottom hem of the dress].
Press all your seams flat and you’re done! Happy weekend sewing!


Beautiful maternity outfit! I like your boots and dress very much!
http://lartoffashion.com
What a comfy and cute maternity outfit! I’m going to sew up a couple to get ready for baby number #2! Thanks for all of the tutorials, I followed one to make a skirt out of a vintage table cloth, it makes me so happy!
Very beautiful! One question- On the neckline it says to sew with a ‘double needle’… Is that an option on the machine or do you mean hand stitch?
good question — sorry I didn’t clarify! You can purchase a double needle (like this one http://bit.ly/205djgM), and then double thread your sewing machine (just one on top of the other using two spools of thread, or one thread and one extra bobbin), and then thread each one of the needles. It will create two straight lines on the top and a zigzag on the back…this allows for some extra stretch so you don’t snap your seams when you’re pulling your dress on. Hope that answers your question! xx
Thank you! 🙂
This dress looks so cute on you! I love how you layered it with the fur vest!
Paige
http://thehappyflammily.com
You look lovely!! What a great color and beautifully simple!
Adorable!
http://www.bluelabelsboutique.com
http://www.fashionnotfear.wordpress.com
i’ve been away from the blogosphere for quite a bit, s i didn’t even know you’re pregnant, so congratulations! and this dress is so lovely:-) x
Such a cute look!
xx
Mademoiselle Coconath
http://mllecoconath.com
Can you tell me the source on the chain link bracelet? Love it! Great dress too!
ah, I wish I could remember! I’ve had it for years and have no idea. Maybe inpink.com? Sorry I’m not more help!
I love this so much! I am 5’8″ and 2 yards isn’t enough to make it come to my knees as pictured on you. Add a belly and it would be a mini dress. I would need 80″ of fabric just for the length (40″ from shoulder to above knee for front and back) plus more for the sleeves and facing to cut like you have pictured. Just a heads up for tall girls who need lots of fabric!!
ah, I wish I could remember! I’ve had it for years and have no idea. Maybe inpink.com? Sorry I’m not more help!