One of my biggest challenges when creating my own clothes is finding fabrics that I love
and match my mental vision. I don’t know why it hadn’t dawned on me to create my own textiles, but when I received my
Sprout by HP and started playing around with its capabilities, the idea just came and wouldn’t go away.
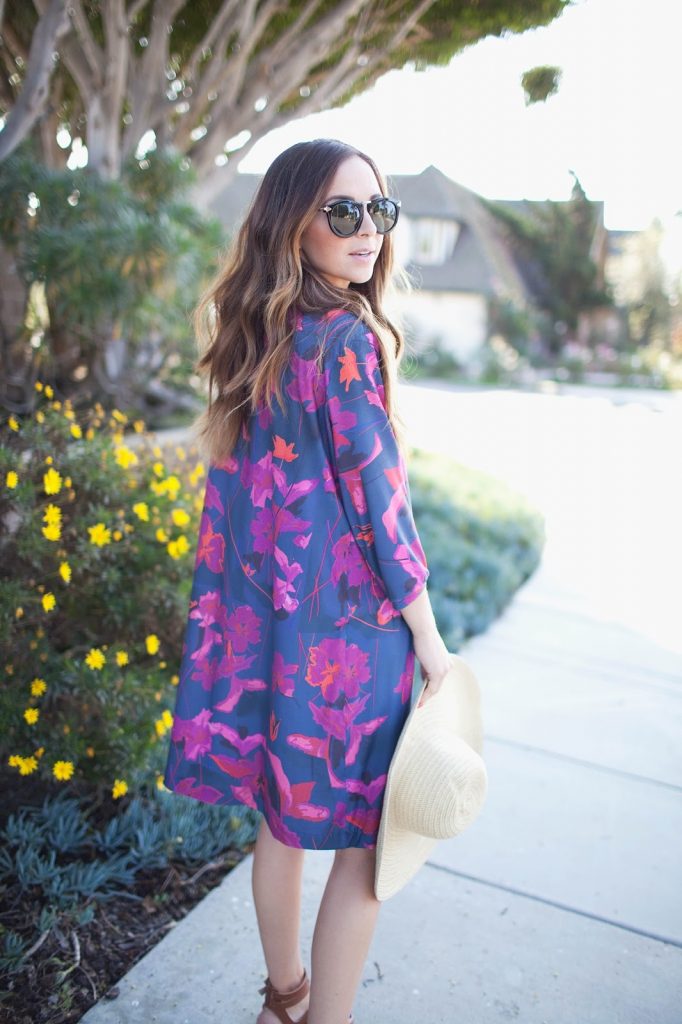
My inspiration was the tropical getaway my husband and I are taking at the end of this month, as well as my current favorite color combination — blue and violet. With the two combined (and the help of some google images of flowers), I drew out this floral pattern using my
Sprout. I printed the fabric on
spoonflower.com, choosing their
modern jersey fabric option, and I couldn’t be more thrilled with the result!
After the fabric arrived, I debated on what to make with it and finally decided on a basic boxy shift dress with 3/4 sleeves with a small cuff at the end. The shape allows the dress to be casual enough for the beach, but it can also be dressed up with heels and jewelry for a nice dinner on our vacation.
The tutorial is super easy, and today I’m sharing it for DIY Friday! Click through to find it!
Materials:
2 yards fabric (I used a lightweight knit, but any fabric works as long as it has a good drape)
matching thread
Step 1. Using similar pieces of clothing as a pattern, cut two boxy DRESS pieces, two 3/4 SLEEVES, two CUFFS (measure loosely around your arm an use this for your width measurement, and make it 3 inches wide), and one strip for the NECKLINE LINING (make the width about 4″ shorter than your neckline opening and 1″ long).
Step 2. With right sides together, sew the DRESS up at the shoulders.
Step 3. With right sides together, pin the top of the SLEEVE and the top of the shoulder together, as shown. Continue down the rest of the arm hole, pinning the sleeve in place.
Step 4. Sew the sleeve to the arm hole with a 1/2″ seam allowance. Repeat steps 3 and 4 for the other sleeve.
Step 5. With right sides together, sew from the elbow to the knee with a 1/2″ seam allowance. Make sure your seams match up at the armpit!
Step 6. Fold the neckline in half with right sides together, and sew the ends together to make a circle. Make sure this circle is slightly smaller than your dress neckline so it has to be stretched to fit around — trim if necessary before sewing the ends together.
Then, with right sides together, pin the NECKLINE circle the neckline of the dress, making sure the NECKLINE seam is at the back of the dress, and then stretching evenly so it fits around the neckline. Sew with a 1/2″ seam allowance around the entire neckline, stretching slightly as you sew so the pieces lay flat. Trim the seam allowance and then tuck the lining inside the dress and press flat.
Step 7. Now let’s move to the CUFF. Fold it in half (right sides together) so the short ends are lined up and then sew across the short side with a straight stitch. Once the CUFF has been sewn into a loop, fold it in half, as shown. Repeat for the second CUFF.
Step 8. Now it’s time to attach the cuff to the sleeve. Stretch the cuff wide, as shown. Now slide the stretched CUFF over the end of the sleeve, with the folded side facing up, and the raw edge facing down. Pin in place.
Step 9. Sew around the end of the sleeve with a straight stitch, stretching in between pins so the fabrics all lay flat together. Repeat for the second sleeve.
Now lay the cuff down flat and it should bounce back to be smaller, making your sleeve gather and become perfectly puffed.
Step 10. Using a wide stitch, top stitch around the neckline to tack the lining in place. Then hem the dress to your desired length.
the post was created in partnership with hp.


Woah!!! Such a pretty fabric and great pattern on this dress! You are so talented!
http://lartoffashion.blogspot.com
What a great dress for spring! Amazing that you were able to create your own fabric! I had no idea that such a website was available. Talk about DIY!!!
Erica
http://www.thedecorina.com
You are so talented! I love that dress!!
The Style Storm
<3, Christina
Merx, this fabric turned out AMAZING! I love the large print and vibrant colors!! Well done.
I love how you draw out your tutorials! It makes it easier to understand and looks so cute. Love seeing your creations!
XO, k | http://www.kokay.me
That fabric is amazing! Is it available for purchase on spoonflower?!
Paige
http://thehappyflammily.com
Very cute! I also like these loose kinds of dresses.
wow, that dress is STUNNING girlfriend! Wish I had talent like that!
Pretty. I love those colors together.
Wow!! Your fabric designing skills are top notch!! Love it!
http://mybowsandclothes.blogspot.com/
wow this is so cool! I love that dress
xo
http://www.laurajaneatelier.com
Love the print of your dress!!! Very pretty!
xo – Anna
http://www.fleurdille.com
Swoon! This is gorgeous! This would be super cute and comfortable to wear to church or just running errands. Great post as usual!
http://www.geekyjessy.blogspot.com
You’re so talented! I really appreciate all the effort you put into these posts (and all your posts!). xxx
You’re so talented. I love it. Happy Sunday! 😀
Ohhh so festive (and makes me want to jet to Hawaii right this second!) Would be a wonderful swim suit cover up. 🙂 Xo, Alison
http://www.simplyfairbyalisonjeanine.com
how cool to design your own fabric.
I love the fabric! Is there a way to purchase the fabric pattern you created on spoonflower?
Me encanta y lo voy hacer. Que talento. Bonito diseño
I have made several versions of your “chambray fit-and-flare dress” and love them, but I’ve been itching to try this one for a while now and finally got around to it yesterday! I was so surprised at how quickly it came together and am wearing it as I type. Thank you for making such clear, accessible tutorials!