
Floral Dress made by me (tutorial below, similar dress here), Fabric c/o Rifle Paper Co., Heels c/o Rack Room Shoes
One of my favorite holiday traditions is making myself a new dress, and Easter is always a good excuse to make a new one. A few days into March I started thinking about my dress design, and just wasn’t feeling inspired. Then randomly one of my readers mentioned that Rifle Paper Co. had just launched a fabric line, and the second I saw it I fell in love. The line is inspired by Alice in Wonderland, and it’s perfectly feminine, whimsical, and modern, and I’m so obsessed.
Most of the fabric in the line is cotton or canvas, which can be tough to use for clothing, but a little section of the collection is rayon — my favorite!

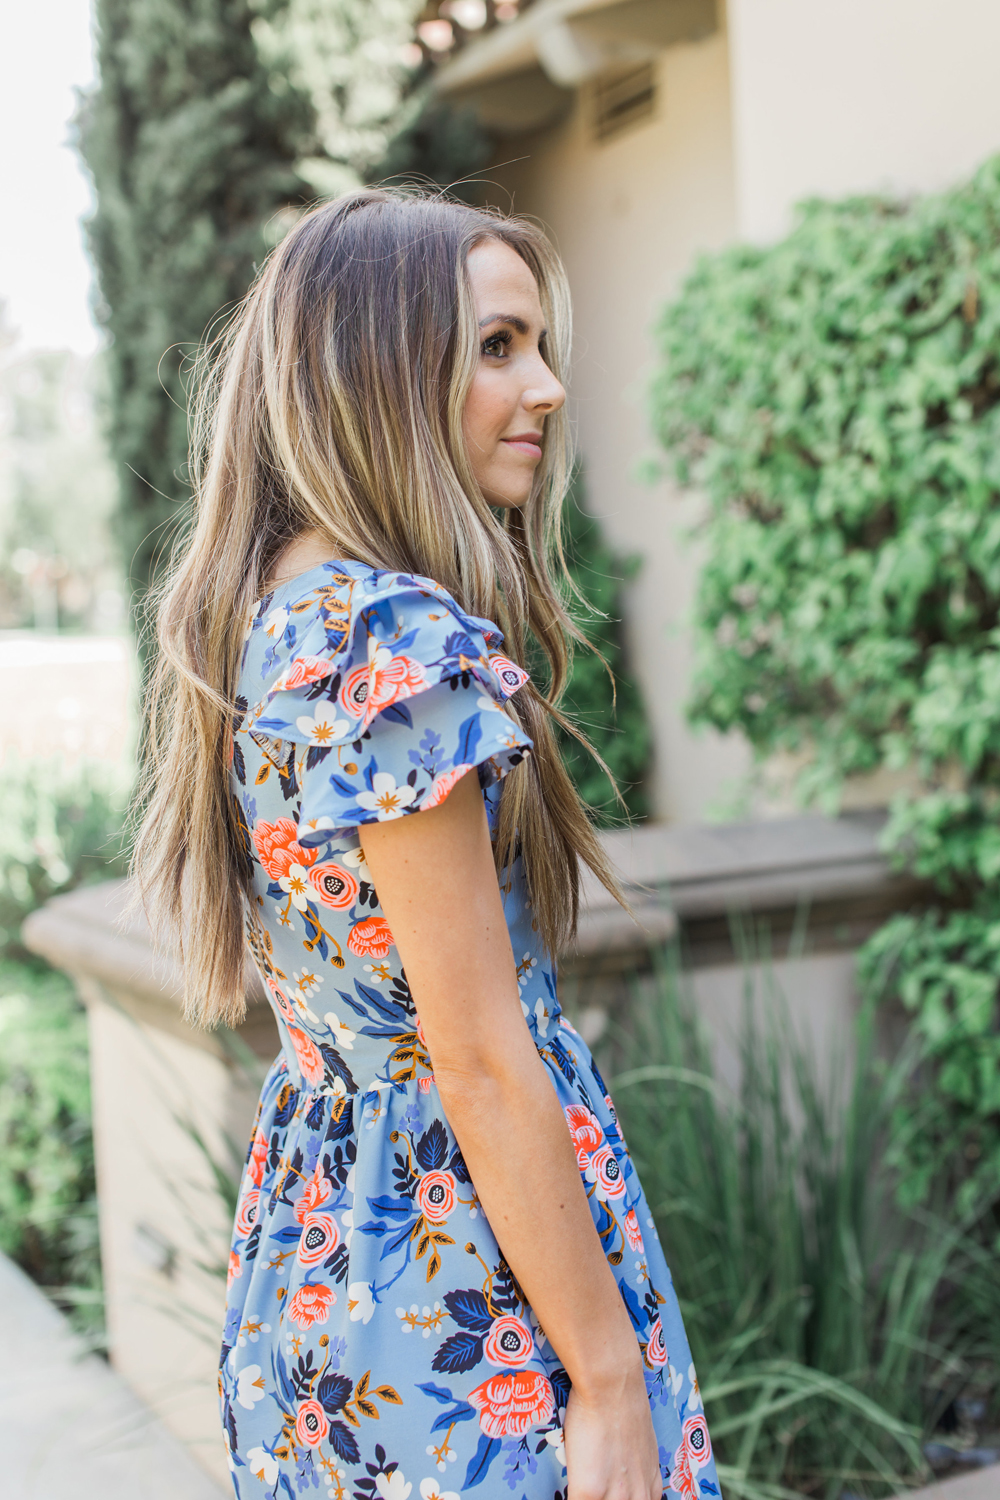

Rifle Paper Co. generously sent me a few yards of this gorgeous light blue floral rayon to make this dress, and the moment it showed up I was anxious and giddy to start sewing. I knew I wanted a midi dress with a fitted waist, but I couldn’t decide on the sleeve design; so I turned to Instagram Stories with two sleeve options, and the vote for these tiered sleeves was almost unanimous!
Today I’m so excited to share the tutorial for this dress!


To make this dress you’ll need:
- 3 yards of fabric (mine is this rayon, but you could also use a heavier weight knit, or other medium weight woven fabrics)
- 20-22″ invisible zipper
- matching thread
NOTE: I don’t provide patterns for my tutorials, only the instructions. I make all of my patterns using the instructions I share in this video.

First, cut your pieces. You’ll need 4 bodice pieces (2 front and 2 back). Then 4 neckline lining pieces (2 front and 2 back). Then 6 sleeve pieces (3 on each side). You’ll also need your skirt piece, which you’ll see in step 11. It should be a large rectangle of fabric. Width = waist measurement x 1.5, length = desired length + 1/2″ for seam allowance.
Step 1. Take your FRONT NECKLINE LINING pieces and sew them together at the point to make a “V.”
Step 2. If you’re inserting darts, do so in the FRONT BODICE pieces now. Then take your two FRONT BODICE pieces and sew them up the front with right sides together.
Step 3. Then take your V-LINING piece and sew it to the FRONT BODICE piece, matching up the V’s. Now flip the lining inside the bodice and press flat with your iron.
Step 4. Take your two BACK BODICE pieces and attach them to the FRONT BODICE at the shoulder seams, right sides together.
Step 5. Take your first SLEEVE piece (the largest of the three) and hem it. Then pull the ends of the horseshoe shape to open it up and create a ruffle.
Step 6. With right sides together, pin this sleeve to the arm opening of the BODICE. Attach the ruffle sleeve with a straight stitch. Repeat for the other sleeve.
Step 7. Once both sleeves are attached, turn the whole bodice inside out and sew up the side seams with right sides together.
Step 8. Repeat step 5 for the other four sleeve pieces.
Step 9. We’re going to tack on the second and third tiers. Fold the edge of the sleeve under (like a tiny hem), and pin in place on the sleeve. I made mine about 1/2″ above the original shoulder seam. Repeat for the other side. [note: I wanted a little more lift and ruffle to these sleeves, so I added a few small gathers in the 2nd and 3rd sleeve and tacked over them).
Step 10. Repeat Step 9 for the last sleeve.
Step 11. Now take your large skirt piece and do a basting stitch along the top.
Step 12. Pull your basting threads to gather the skirt. Gather it until its width is the same as the width of the bodice.
Step 13. Tuck your bodice inside the skirt (with right sides together), and match up the waistline. Sew around the entire waist with a straight stitch, attaching the bodice to the skirt.
Step 14. Add your invisible zipper in the back using the instructions on the zipper. Then sew up the back of the skirt.
Step 15. Hem the bottom of your dress to your desired length and you’re done!
Shop this Post


Why do you say cotton doesn’t work well for clothing??? It presses beautifully, it is so easy to work with, it breaths well and there are so many options out there!
It definitely works for some projects! Just quilting cotton tends to be a little stiff and inflexible for most of the projects I make. But yes, so many beautiful options — I wish all fabrics had that many prints and colors!
Well quilting cotton yes, I wasn’t referring to that though. I was talking about all the cotton designed for garments, chambray, voile, denim, gauze, lawn, flannel, twill, and cotton knits.
Ah yes — my mistake! I love working with so many of the fabrics you mentioned! But i’m always a little nervous to order cotton online because so many of the fabrics I’ve ordered over the years have that stiff quality that quilting cotton has. It’s hard to know until you feel it!
You’re looking so adorable in this summery dress! Lovely outfit!
https://lartoffashion.com
I LOVE this dress! I have only sewn with cotton- is rayon similar to work with or is it slippery?
It’s a little more slippery than cotton, but not difficult to work with at all! Now that you’re comfortable with cotton, Rayon is a good next step!
amazing! I’ve adored this print for a long time, and I have the perfect pattern picked out for it! 🙂
Can you share more in your sewing posts about details and your thought process? For example, how did you hem this dress? And why did you choose to do the bodice in 4 pieces instead of cutting the front and back on the fold? It seems to interrupt that gorgeous pattern…is there are reason you did that?
Also, have you ever considered doing true patterns, even just digital ones? I find it hard to follow these exactly, and I’d LOVE to be able to buy patterns from you. Your pieces are so fresh, stylish, and straightforward, and I would love to be able to duplicate them exactly!
xo
Hi Rachael! Great questions.
I hemmed the dress by serging the end and then folding it up about 2 inches and doing a straight stitch. I chose do the front of the bodice in two pieces so I could create a very pointed V for the neckline — if I’d done one piece, it wouldn’t have been quite as sharp. Because the pattern is quite busy, I don’t feel like it distracts from the dress…but it doesn’t work so well with every print!
I have considered doing digital prints, but there’s quite a learning curve for them AND they demand a lot of time. I’d love to provide printable patterns, but it would slow down my process a lot and would limit the amount of content I’m able to produce, so I’ve chosen to not go in that direction. One day I hope to sell my own designs though so you can just buy the identical piece 😉 Thanks for following along! xo
This dress is gorgeous! I loved seeing it all come together on your instagram stories!
Paige
http://thehappyflammily.com
I’ve been seeing this print for a couple of days now and I absolutely love it! Now that I know the line is inspired by Alice in Wonderland I love it even more!!! I am actually planning on signing up for your online classes this summer I’m super excited about it!
This is adorable
If we’re being technical, though, this is rIfle’s first collection, les fleUrs. It’s their second collection, wOndeRland, that’s based on alice in wonderland I’m obsessed too!
Hi! Can you better explain how to make darts in a homemade pattern? I am not sure how to do that and i really want to make this Dress!!
Ashley I answered your question. I replied to Lora she had the same question. good luck.
I second Ashley’s post. I was just trying to figure out where darts (particularly bust darts) should lie when the dress is on. I have your online sewing class (which i refer to all of the time, by the way), but there isn’t much detail on the fit of the final product, and none of my clothes seem to have darts for me to use as examples. Thanks for all of your great ideas and inspiration, I wouldn’t be able to sew without you!
Lora and Ashley I have been sewing for over 50 years and when I learned to sew fitting cloths using darts and pattern adjustments was part of every pattern. The purpose of the dart is to help the fabric around curves fit better. The amount of the dart increases the underarm length by the amount of the full open dart, other wise the length of the front and back under the arm will not match. you can take the front pattern piece and hold it to your chest, then notice how the space under your arm reacts to the curve of you breast. Notice the point of your breast which is the apex of the breast. the apex is the part that is the breast is the farthest out from the chest. the dart will not go to the apex, it will go to the side of the breast leaving enough ease for the fabric to lay well. So, with the pattern piece over the chest placed where the center line and the waist line belong (you may want to pin the pattern to your blouse) use your hands at your side to smooth the pattern up until you get a loose place in the pattern where it sticks out from you. gently begin to fold the pattern until you find the best place with the pattern folded to produce the best fit. Crease the fold on the dart, being sure to mark three places for the dart fold the two lines which will be sewed together and the deep fold of the dart. You will notice the arm hole will not be correct it will be too low, which is the result of the dart. with the dart still folded compare the front and back side seam, they will not match. This shows you how much needs to be added to the front side seam to make them match. Notice also if the side of the front is straight, it may not be that is fine it just means the area above the dart needs to be expanded just enough to cause the side seam to be straight when the dart is folded in. The dart will be sewn with the extra fabric folded toward the waist, and when folded the dart should be straight with the rest of the side seam. The dart is usually a bit of a triangle on the side of the pattern. just play with it a little and you will quickly find the correct angles. Make the correction to your front piece. be sure to sew in and press down the darts before doing any other sewing to the front pieces. good luck
.
I almost forgot. when you cut out the front before you take the pattern off the fabric get six straight pins; at the point of the dart and the points where the dart intersects the seam line place a straight pin up from the bottom of the fabric going through both layers of fabric and the pattern. be sure to not loose the pins when you take the pattern off the fabric. then take the three remaining pins and place them in the exact same spots as the pins which are already in the fabric going through from the opposite direction than the first three pins. so, you should have three pin heads on opposite sides of the two layers of fabric. As you pull the two pieces of fabric apart you will have three pins in each front piece. use the pins in the seam as a way to match the sides of the dart. do not remove the pins make sure you pin the fabric with the dart fold in place the single pin is the end point of the sewing of the dart. You start sewing the dart at the edge of the fabric going to the single pin as the point you sew off the fabric. just before you sew off the dart put in a couple of back stitches to secure the thread.
i ABSOLUTELY LOVE THIS DRESS, i’M OBSESSED WITH THAT FABRIC AND HAVE SOME IN MY STASH. tHAT’S HOW i FOUND YOUR BLOG ACTUALLY, LOOKING FOR INSPIRATION OF WHAT TO MAKE WITH MINE 🙂