
Outfit Details:
Gingham Top made by me (similar here), Mott and Bow Jeans, c/o, Ankle Boots (on sale!), Madewell Tote, Quay Sunglasses
Gingham is one of my favorite prints that can go from summer to fall so easily. I got this fabric a few months ago and planned to make a summer dress, but now that summer is over I decided to make this pretty ruffle sleeve top instead.
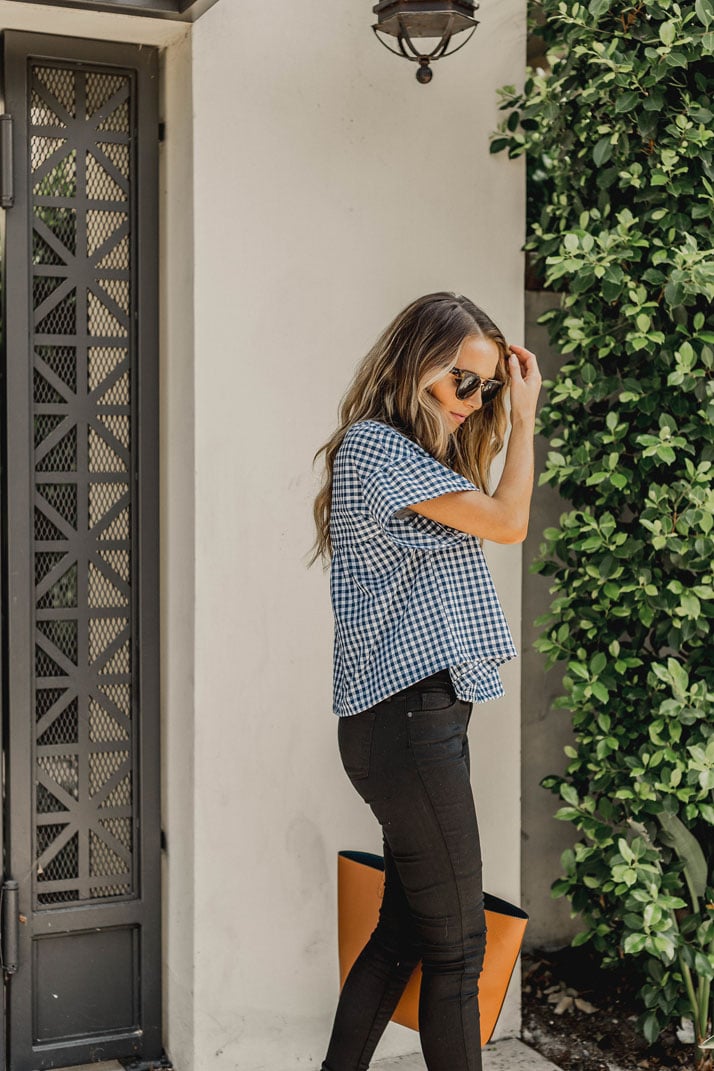


It’s the perfect fall top that you could wear with jeans and ankle boots, or tuck into a pencil skirt with tights and heels.
Today I’m going to show you how to make it! If you’re new to sewing, check out my online sewing course! And don’t forget — I don’t provide printable patterns with my sewing tutorials, but this video shows how to create a custom pattern from your own clothing.
Now time for the tutorial! This one is pretty easy and can be whipped up in an hour or so.
Here’s what you’ll need:
1.5 yards fabric (I used this one)
1 button
matching thread

First cut your pattern pieces. I don’t provide printable patterns, but this video will show you how to make your own patterns. You’ll need a cropped BODICE BACK and FRONT, 2 SWING HEM pieces (these should be about 1 1/2 times the width of your bodice piece, and your desired length), 2 NECKLINE LINING pieces (cut as shown), and two pieces for the ruffle sleeves (roughly 30″ wide and 6″ long).
Step 1. Take the BODICE FRONT and BACK pieces and sew them together at the shoulder seams. Make sure the right sides of the fabric are together when you sew.
Step 2. Take your NECKLINE LINING pieces and do the same.
Step 3. Take your LINING and BODICE and sew them together around the entire neckline. Then flip the lining inside and press in place. Top stitch to keep in place if you want.
Step 4. Take your ruffle sleeve pieces and hem them along one long side. Then do a basting stitch along the other side.
Step 5. Pull the basting stitches to gather the fabric.
Step 6. Open your bodice and lay it on a flat surface with the right side of the fabric facing up. Lay one of your gathered sleeves face side down and pin along the arm opening. Then sew in place. Repeat for the second sleeve.
Step 7. Once both of your sleeves are on, turn the bodice right side in and sew the sides up with a straight stitch.
Step 8. Take your SWING HEM pieces and baste and gather along one edge.
Step 9. Sew the two SWING HEM pieces together on the sides (you could sew them together first and then gather if that’s easier).
Step 10. With right sides together, attach the BODICE and SWING HEM together with a straight stitch.
Step 11. Hem the top to your desired length, and then sew the button onto the back and either add a button hole or a loop for closure.
And you’re done!

Shop this Post


This ruffle sleeve top is amazing! I totally want to take a try at this with the new sewing machine I got for my birthday!
Paige
http://thehappyflammily.com
Ooh, yay for a new machine!!
Merrick, you always trick me into thinking I can sew lol lol
Haha! YOU CAN!!
I can’t lol lol
Where would you say the bodice line hits in comparison to your bustline? Love the look on you!
Just slightly below it. Like, right in line with the base of my bra. I’m very flat chested though, so if you’re bustier you might want to change the location a bit. Hope that helps!
Your blog is so great! I just started sewing (clothing) a few months ago (and took your online class!). I’m sure it’s a ton of work, but I would totally buy and download patterns if you made them! I’ve been using some easier ones from McCalls that you’ve recommended and a few from Lotta Jansdotter, but don’t think I can whip one up from scratch just yet.
Very simple and easy(and beautiful)! Did it in 3 hours. ☺
[…] merricksart […]
Thanks for the information. sounds so great and helpful. Kudos!
[…] style. I’m such a huge fan of her refashions! I was convinced that this would be the perfect top to create out of my fabric […]
I appreciate the information you have shared. Merry Christmas 2019
[…] merricksart […]
I tried clicking on the link to show patern instructions for this and it isn’t pulling up. Do you have a YouTube channel?
This is a very nice blog and learned more knowledge to read this post thanks for sharing this informative post.
Hope more people will read this article keep up the good work This Article is Awesome. It’s help me a lot. Please keep up your good work. We are always with you and Waiting for your new interesting articles. Fallen Kingdom Claire Dearing Jacket
Your facts amazed me and aroused my curiosity. Please keep giving us such wonderful content.
Black Widow vest
Unfortunately, most Hershey’s chocolate products are not vegan-friendly.
Smoke wholesale houston refers to the thriving market for smoking and vaping products in Houston, Texas. Houston boasts a diverse range of smoke wholesale businesses catering to the demands of both retailers and consumers.
The link to the tutorial video for patterning the bodice does not work. Can you please send me the link?
This story is very interesting, related to my interest, and helps me seek knowledge. I wish
you will be writing some more articles related to this matter.
Your blog is so great also we are selling The Fall Guy 2024 Ryan Gosling Leather Jacket
Does the tutorial give scaled drawing ? or do you have another document to provide because it is really difficult for me to understand the size of each pattern piece ; I am not an expert at all . yourI really love the shape and i would be very gratefull if you can give more information. Thanks in advance. Sophie
Wow, these happiness suggestions are truly incredible! My preferred strategy is to reduce distractions. The majority of individuals, in my opinion, are unhappy because they are preoccupied with what they do not have. Be glad in hope, patient in affliction, and faithful in prayer, says Romans 12:12.l
Mexico jackets are a vibrant reflection of the country’s rich cultural heritage,
with intricate embroidery and bold colors that tell stories of tradition and pride.
Leather Jacket
It’s such a handy article. Very interesting to read this article. I want to thank you for the efforts you made to write this awesome article. women faux leather jacket
I’m pleased to discover your well-known writing style for the content. Right now, you make it simple for me to understand and put the concept into practice. Thank you so much for the post.
Interesting insights on the price increases in the new catalog! I think it’s always a balancing act between quality and cost. Speaking of value, the Stussy 8 Ball Hoodie is a stylish and versatile piece that’s definitely worth investing in this season.
I’m pleased to discover your well-known writing style for the content. Right now, you make it simple for me to understand and put the concept into practice. Thank you so much for the post.
Shop Hellstar Latest Streetwear Collection. Best Collection of Hellstar Clothing, Including Hoodies, T-shirts, & More. Order Now!
Get the new Trapstar Hoodie from Trapstar Official Store® with 50% off and fast shipping worldwide. Cheap Price, Come Fast & Order now!
Great article, First of all, I want to express my gratitude for the fantastic work you do. Your post is quite informative, and I attentively read it. We really benefit from it. I hope others find your post to be interesting. Please keep giving us this information.
You explained things in such a clear and thoughtful way. It’s refreshing to read content that feels both informative and relatable. Thanks again for putting this together.
After reading this article, it had a lot of useful information, and I also recommended that several of my friends read it.
Great post! I really enjoyed reading your insights about modern streetwear trends. Recently, I have been researching the popularity of the Essentials Hoodie and how it has become a top choice for minimal fashion lovers. I have also shared some helpful details and styling tips on my website https://trendyessentialshoodie.com/ for anyone interested. Thanks for sharing great content!
Shop official Drake Merch, Hoodies, Shirts, and Tour Clothing. Trendy streetwear for fans with premium quality.