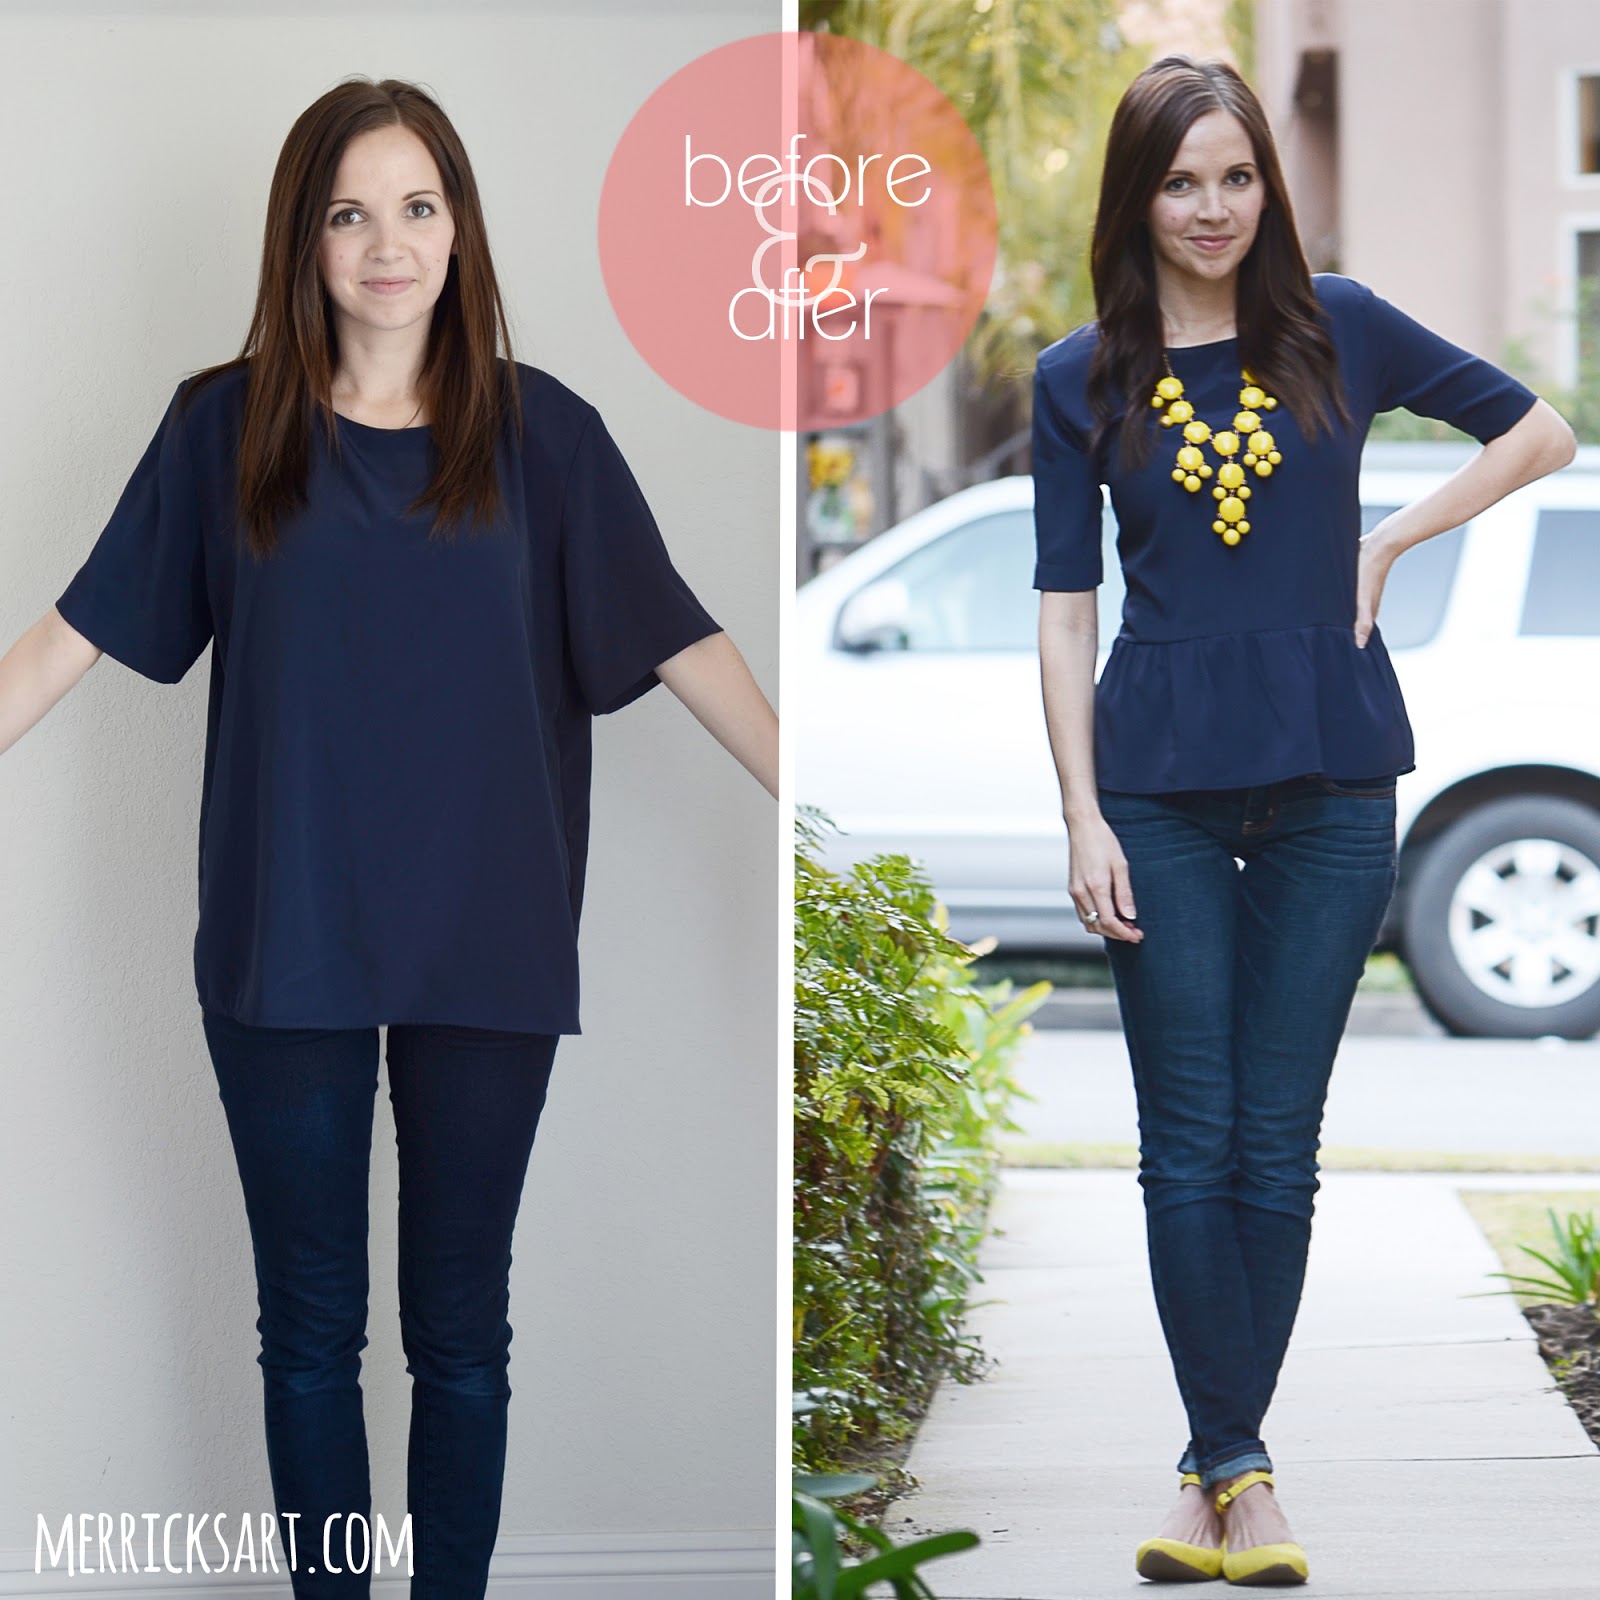
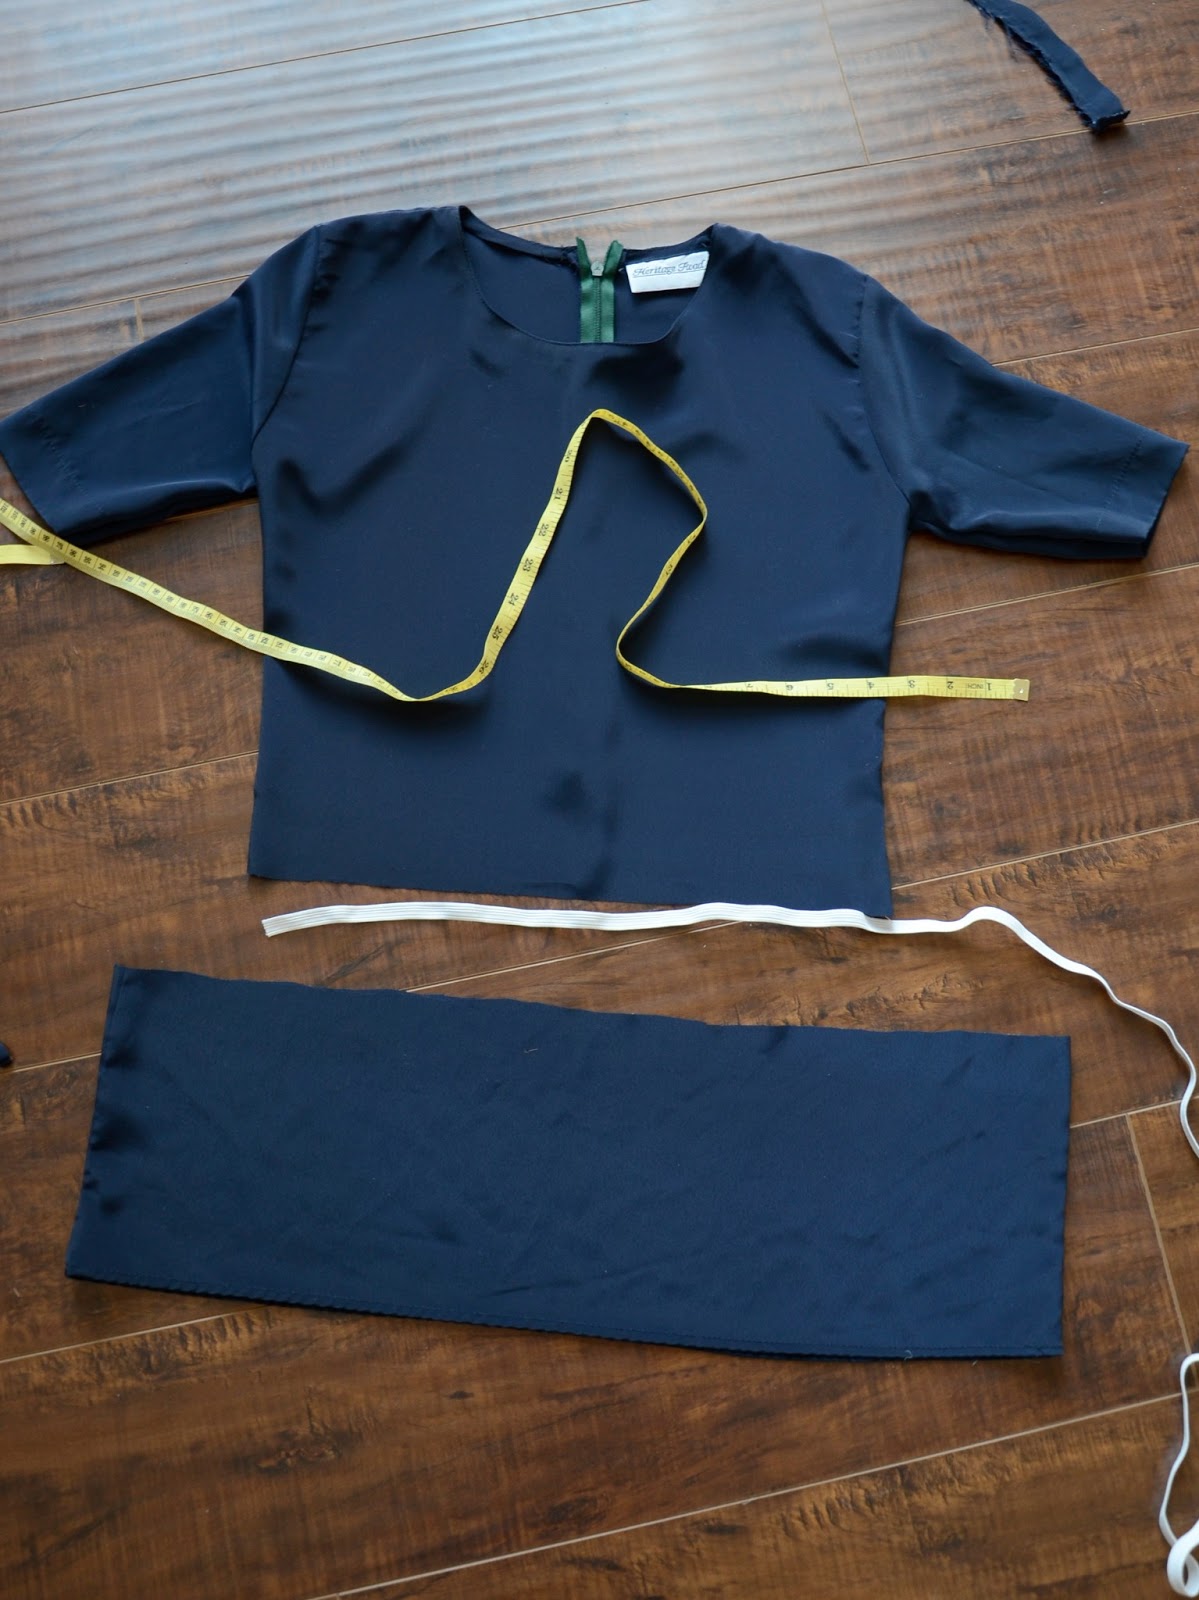
Months ago, when I was still in Utah, I went thrift shopping and picked up this ginormous navy blouse. I had no brillant refashioning plans, so it sat in my fabric box for many months until just this week I saw a peplum top and instantly knew that’s what this top was destined for.
With my 2013 goal to be a better seamstress, I really took my time on this project, making sure to think through each step, and I am thrilled with how it came out!
I didn’t have a blue zipper, but this green one made for a fun pop of color — now it’s my favorite part of the top!
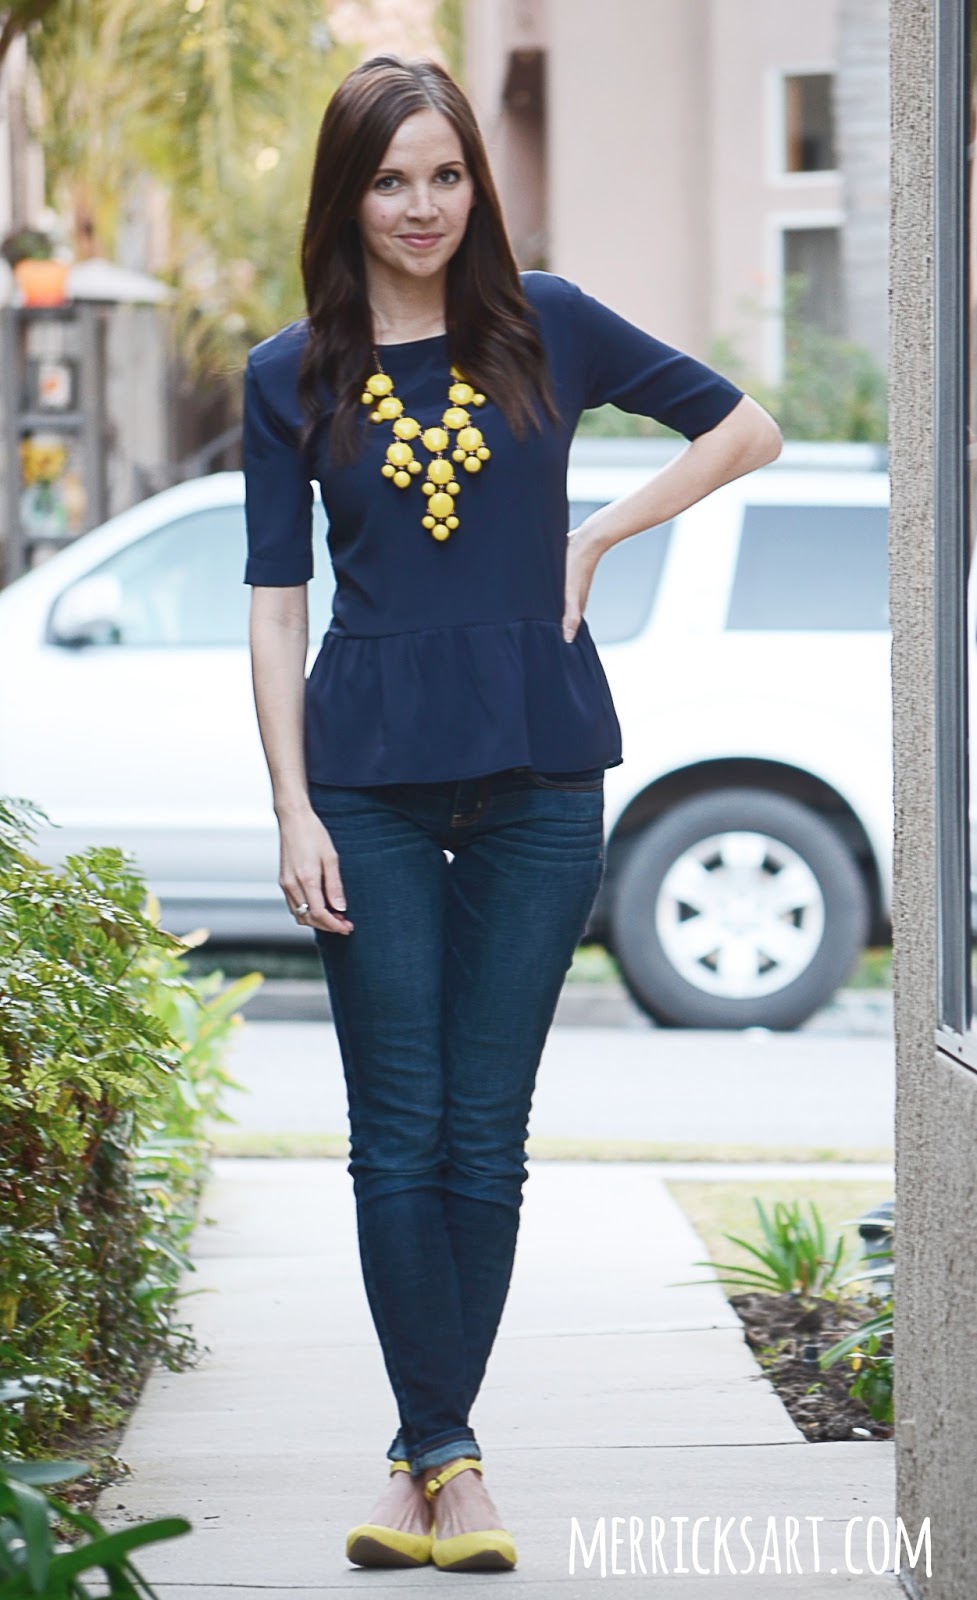
top: thrifted/refashioned by me // jeans: american eagle // necklace: c/o
wild about jewelry // shoes: old navy (in store only)
This isn’t a difficult tutorial, but it does have a lot of steps. Just forge through!
Materials:
- oversized blouse (these are a dime a dozen at the thrift store)
- zipper (optional)
- matching thread
- seam ripper
- elastic
- measuring tape
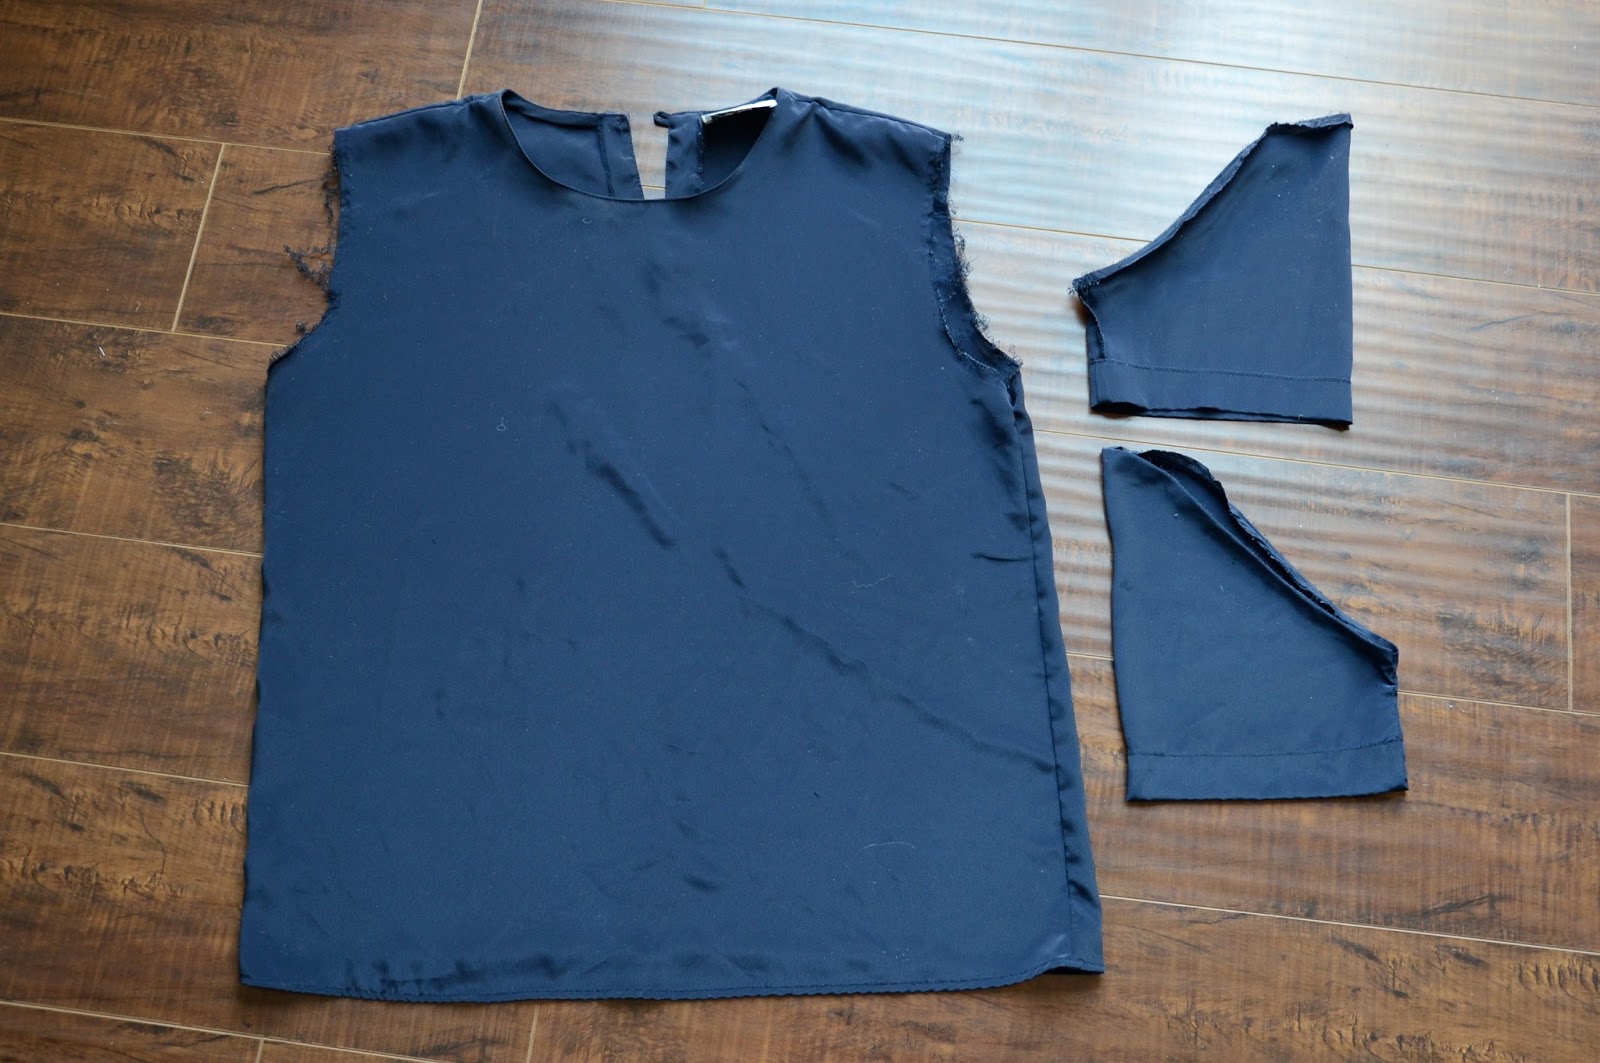
STEP 1. Using a seam ripper, remove the sleeves from the bodice.
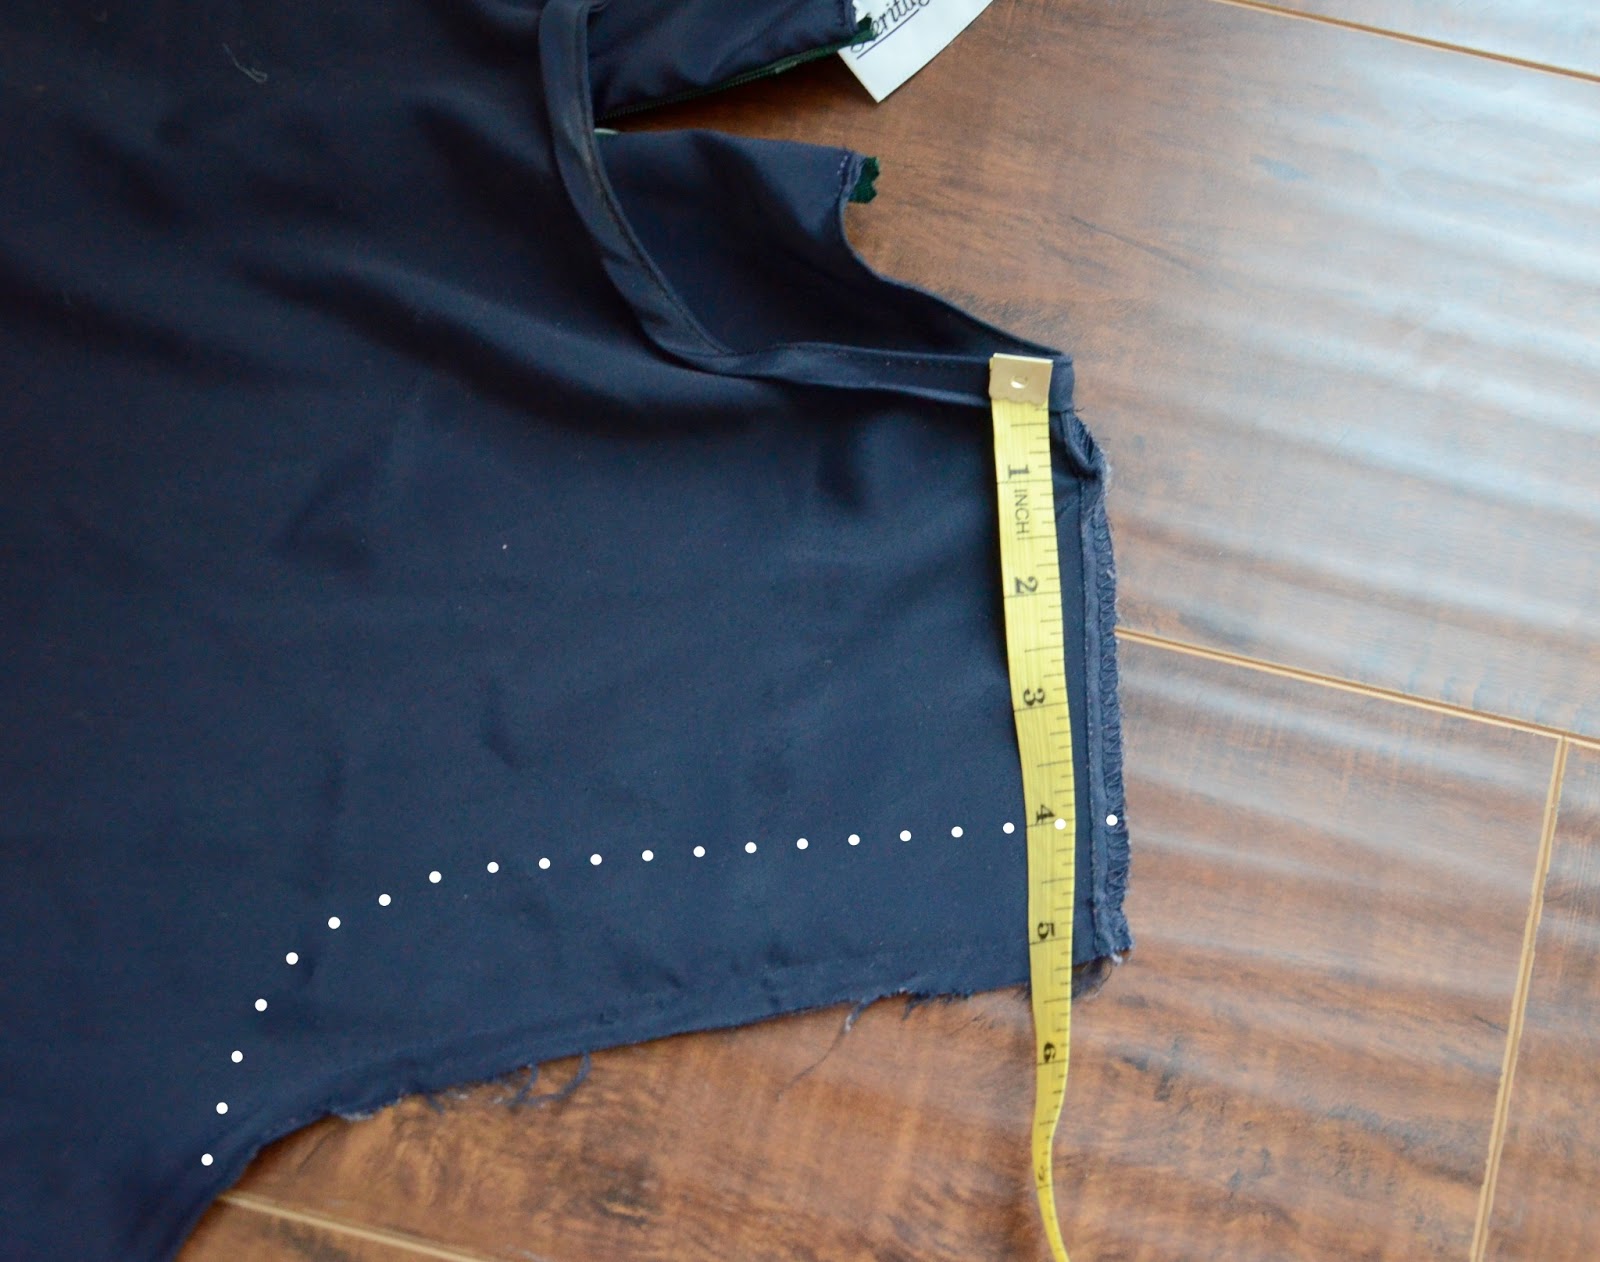
STEP 2 (Part 1). Measure from your shoulder to your natural waist, and then carefully cut your blouse to that length. Set aside the extra fabric from the bottom of the blouse — this will become your peplum later on.
STEP 2 (Part 2). If your material isn’t stretchy, you’ll probably need to put a zipper in the back so you can get in and out of the shirt once it’s slimmed down. Cut a straight line down the back of the shirt and insert a zipper. I used a 22″ invisible zipper, and cut it down to be about 17″ or so. You can make your zipper go all the way down the back — I left about 3 inches at the bottom and just sewed that part closed.
Once your zipper is in, the back of your bodice should look like this:
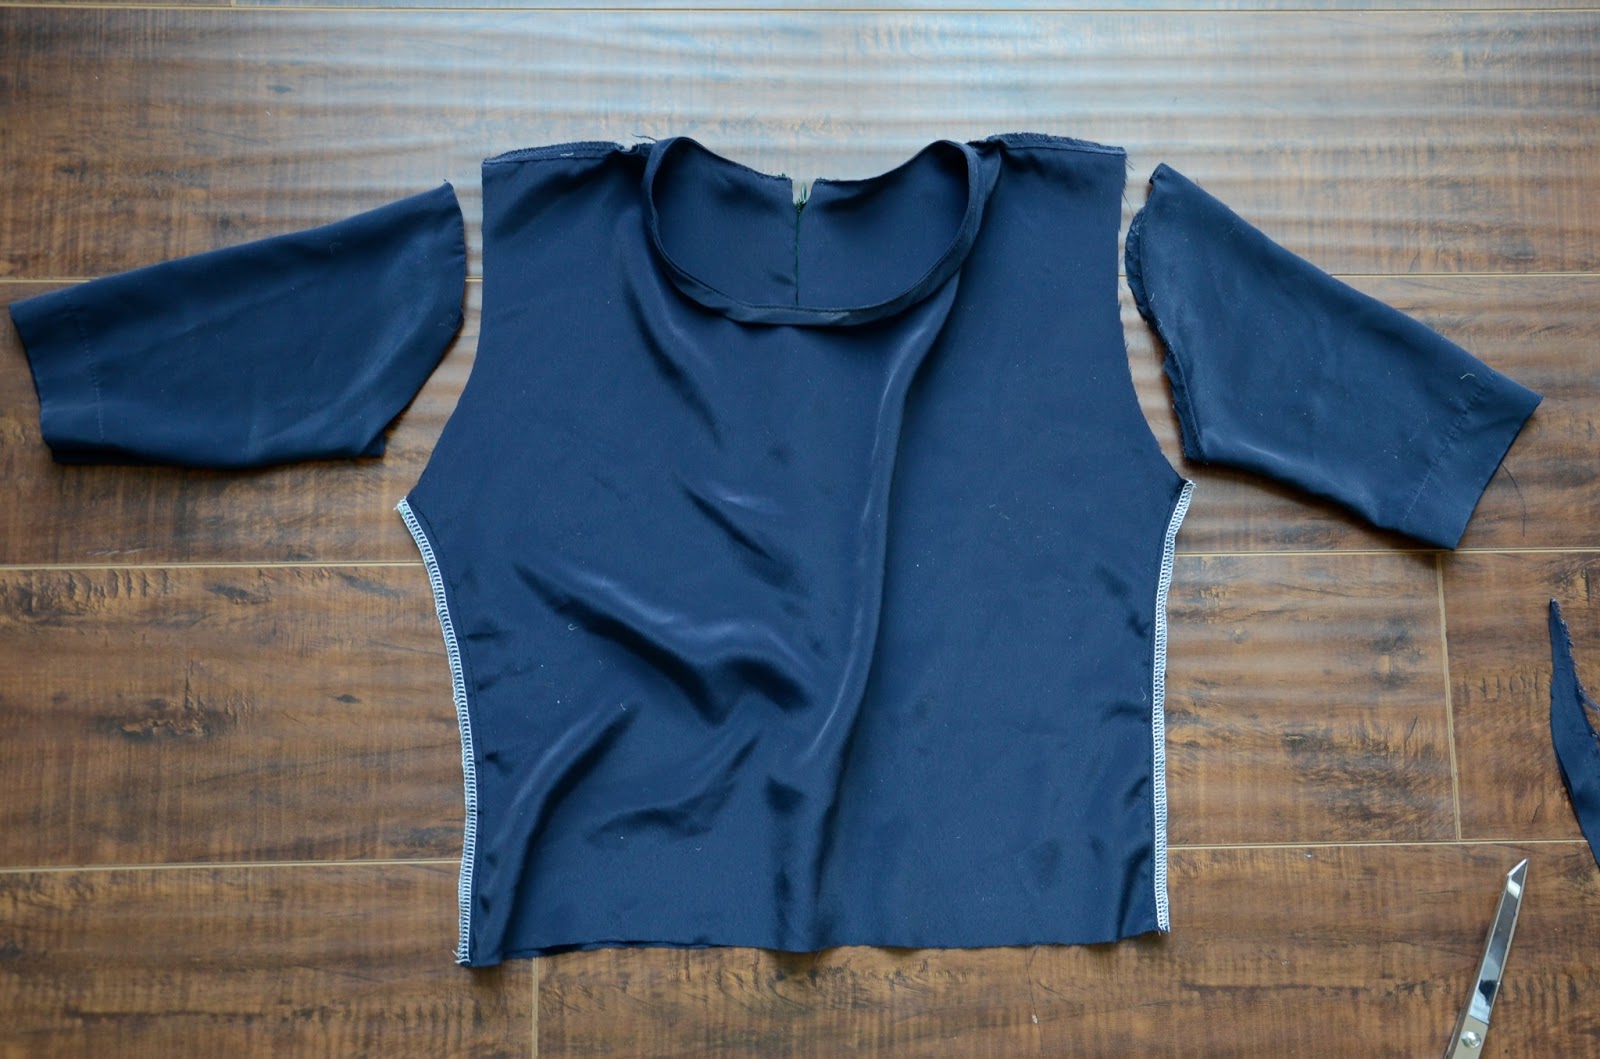
STEP 3. Moving to the sleeves, pull the oversized sleeve (turned inside out) up your arm and mark with a pin how much you want to take it in. Make sure your seam curves to allow some movement at the armpit (as seen below). Sew with a straight seam along the dotted line, then trim off the extra fabric and zigzag or serge the raw edge to prevent fraying.
Repeat on the other sleeve. They should now look like this:
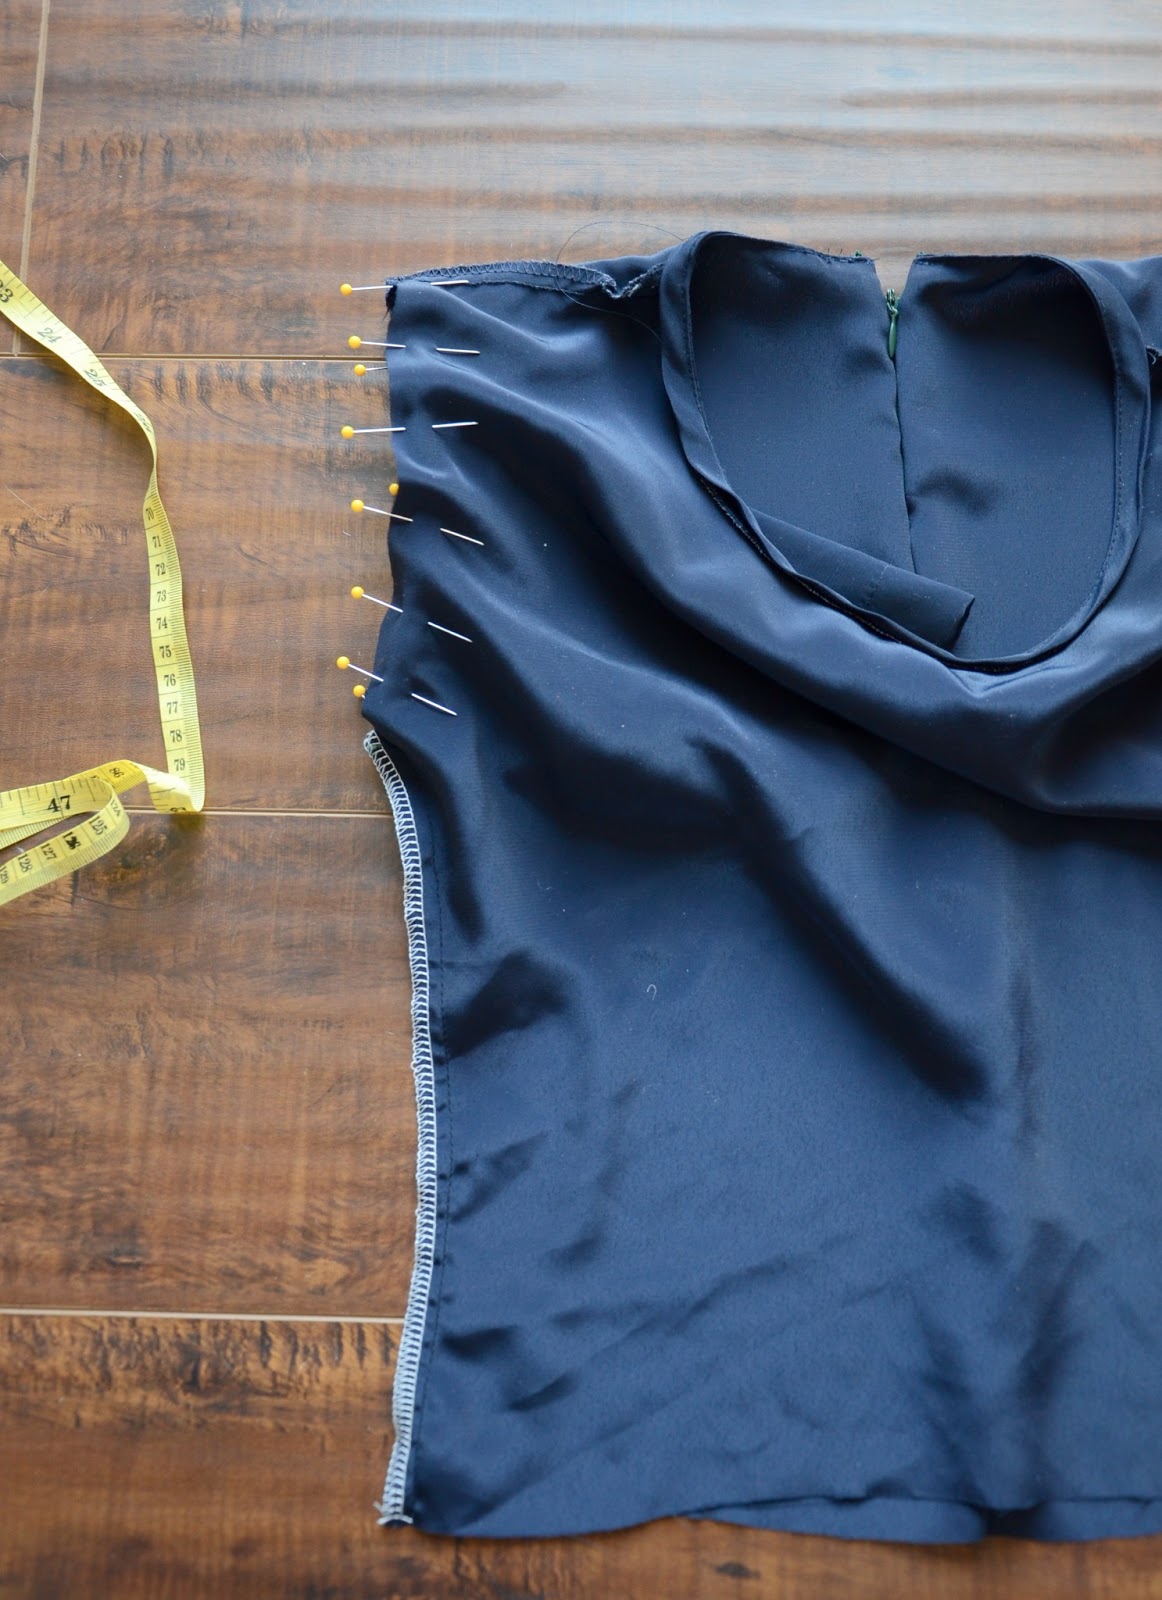
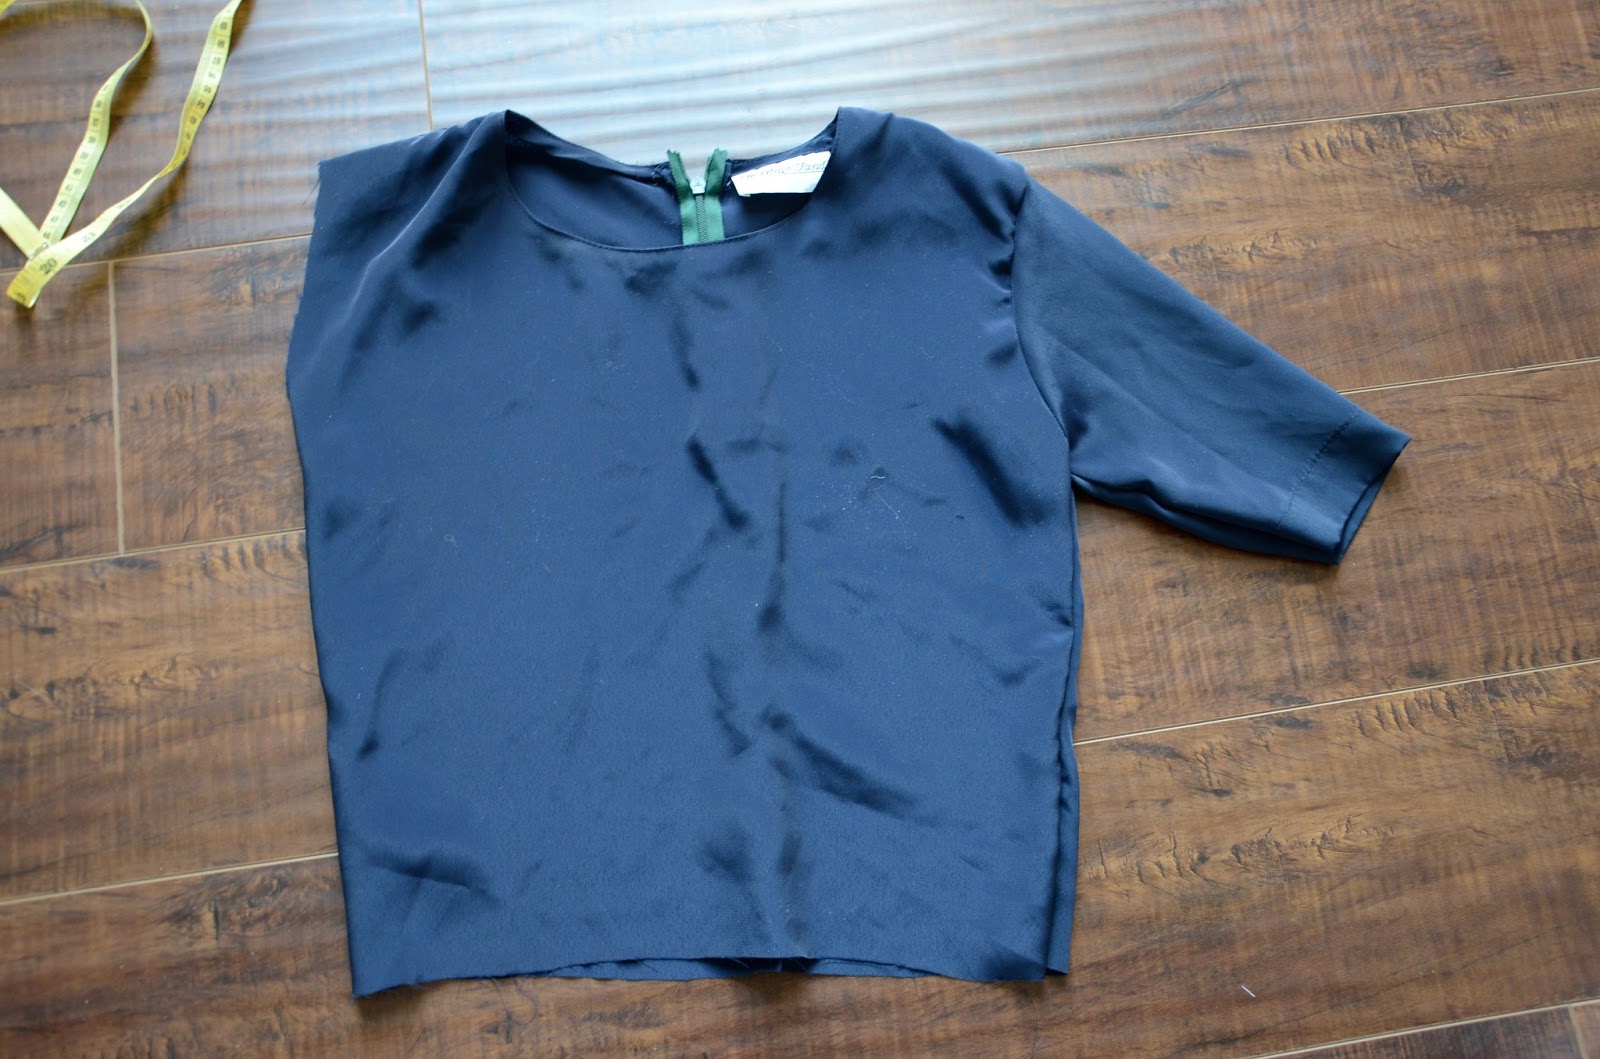
STEP 4. Going back to the bodice, turn it inside out and try it on. Mark with pins where you want to take it in (make sure your zipper is centered in the back).
Carefully remove the top and sew with a straight stitch along your marked lines. Trim off the extra fabric and zigzag or serge the raw edge to prevent fraying.
You should now have three pieces that look like this:
STEP 5. Now it’s time to attach the sleeves to the bodice. First, try on the bodice and measure how wide you want the shoulder width, then trim the arm holes. I cut mine down to 4 inches wide, as seen below.
Then, with right sides together, pin the sleeve to the bodice, as seen below.
The arm hole on the bodice will probably be slightly larger than the arm hole on the sleeve — this is normal. As you pin, distribute the extra fabric evenly between pins, and then as you sew, stretch the fabric as much as you can and you will be able to avoid tucks.
Sew around the entire sleeve with a straight stitch, then trim off the extra fabric and serge or zigzag the raw edge.
Once your sleeve is attached, turn it right side out and press. The extra arm hole fabric, that I mentioned above, might create a little waviness, but it will iron right out as long as you don’t have any tucks.
Your shirt should now look like this (this is pre-ironed — see the waviness?):
Repeat STEP 5 to attach the second sleeve.
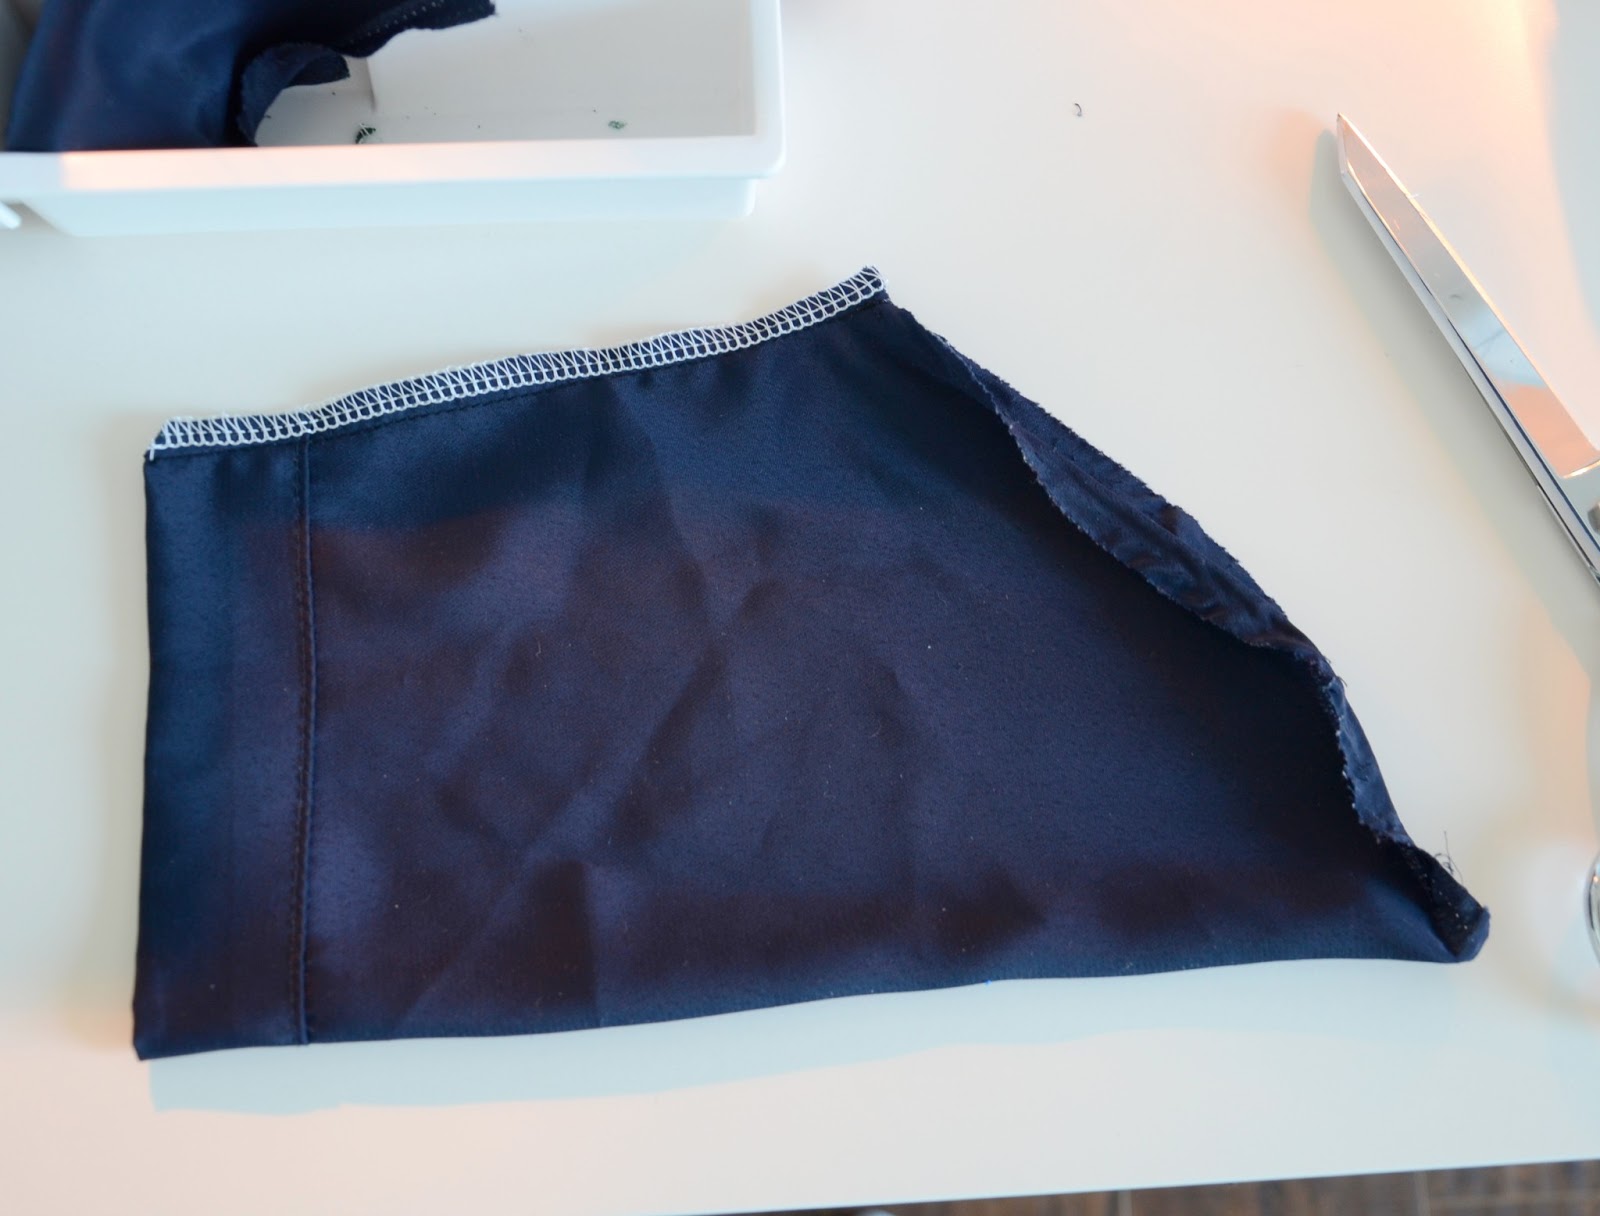
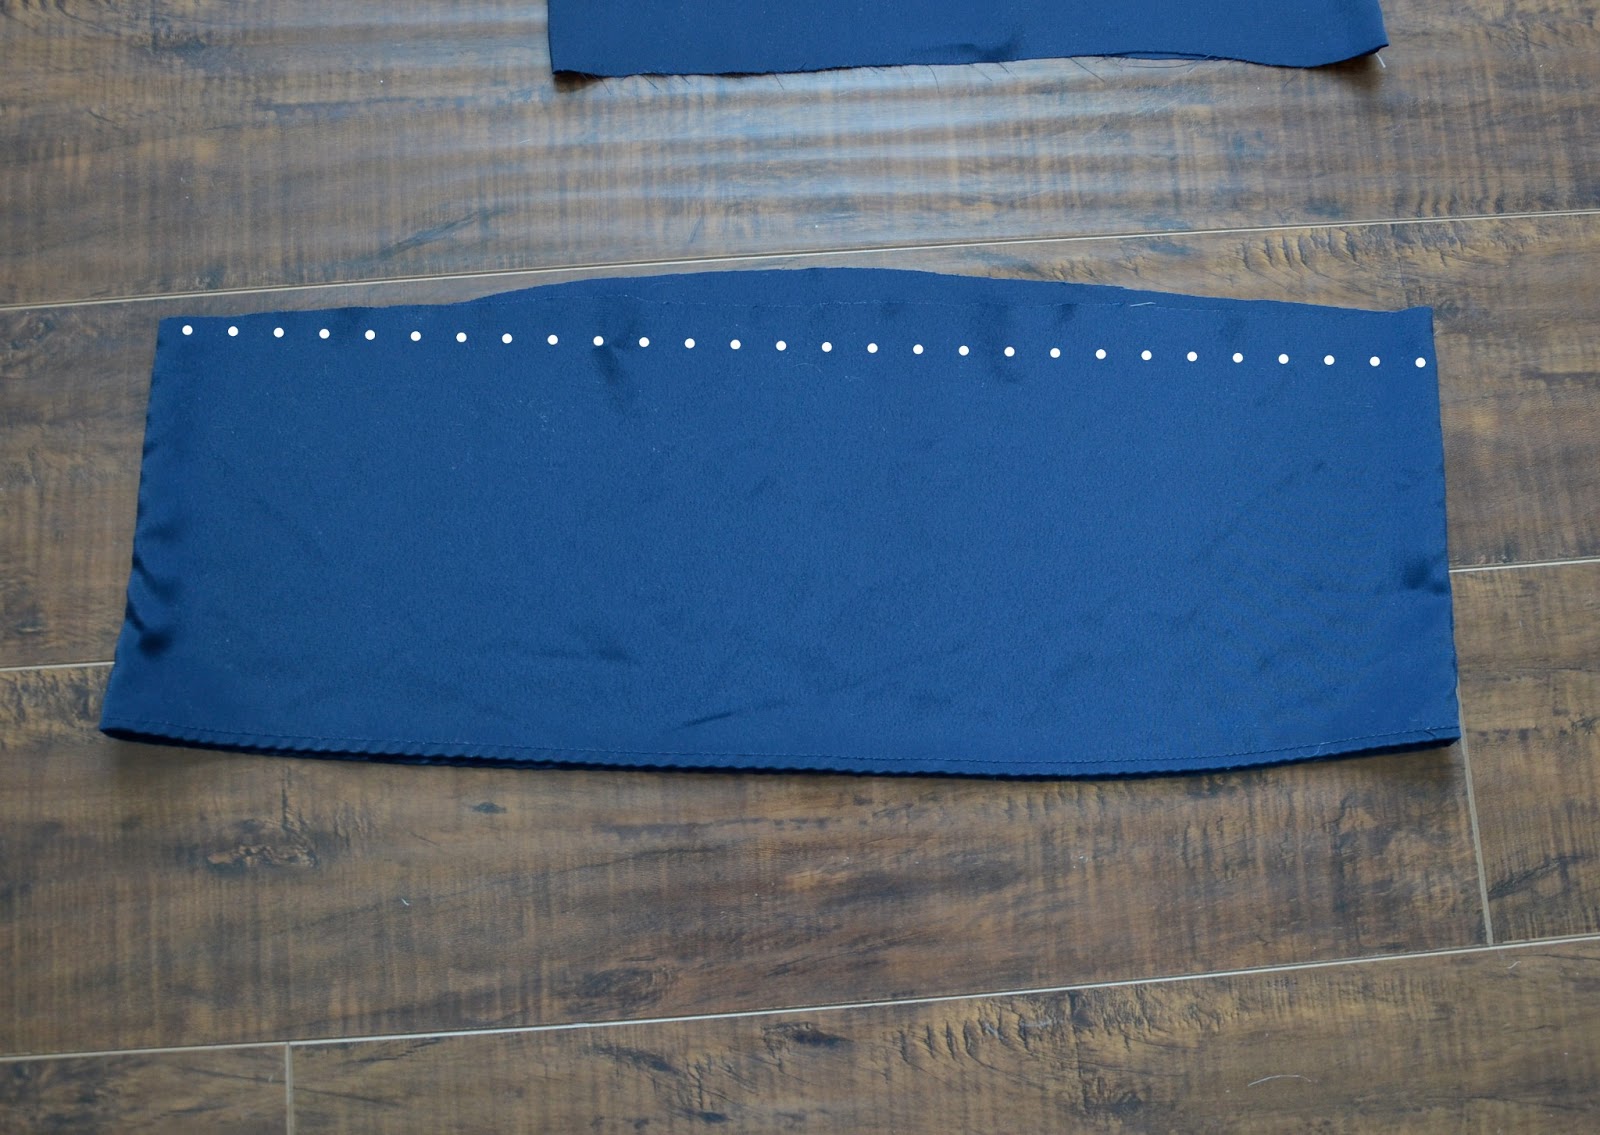
STEP 6. Now let’s move to the peplum. Take the bottom of the blouse that we cut off at the beginning and trim it down if necessary so it’s completely even all the way across. (mine was 7″ tall once it was trimmed).
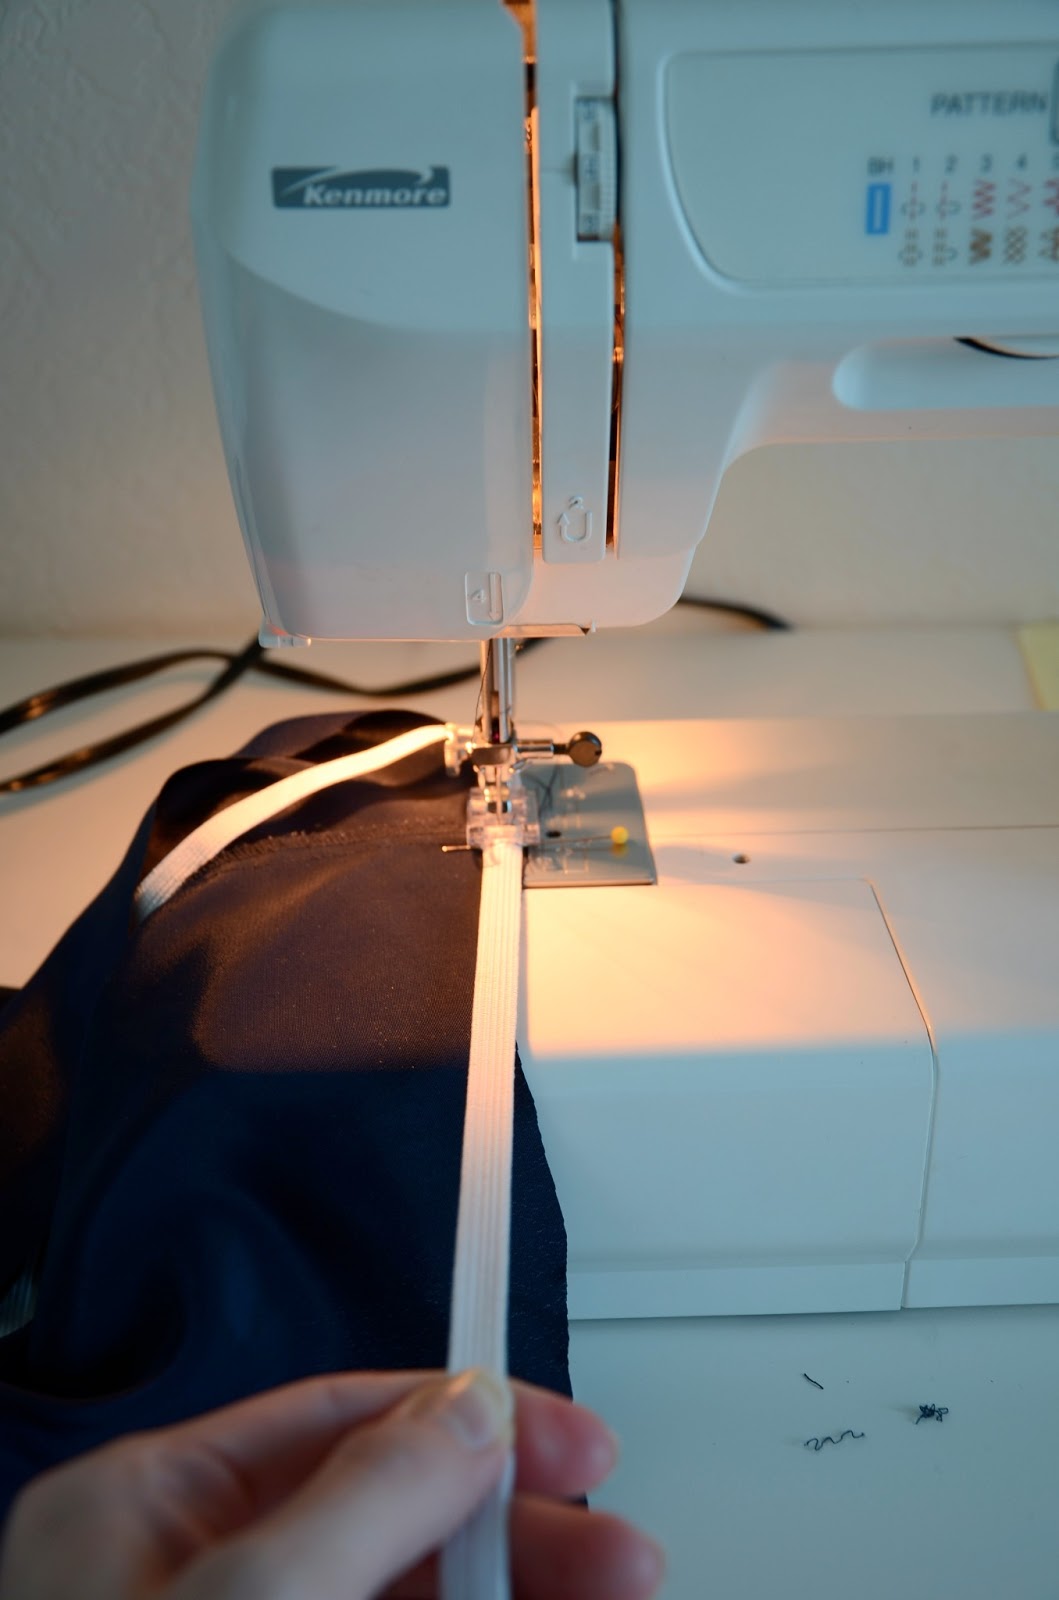
STEP 7. Measure the width of the bottom of your bodice (where your natural waist is), and cut 2 pieces of elastic in that length. Sew the ends of the two pieces of elastic together to make a big circle.
Pin the circle of elastic to your peplum (I pinned mine in four places, which you can see two photos down, and sewed in sections, pulling the elastic tight in between pins). Sew around the entire peplum, stretching the elastic as you sew (as seen below).
The bottom of the bodice and the top of the peplum should now have the same circumference measurement, and your peplum should look like this:
STEP 8. With right sides together, attach the peplum to the bodice. Using a straight stitch, sew next to the elastic (don’t sew on the elastic!) as shown below with the dotted line.
Once the peplum is attached, use a seam ripper to remove the elastic (keeping it there just adds bulk to the waistline, which you don’t want, obviously).
Once the elastic is removed, trim the seam allowance and zigzag or serge the raw edge to prevent fraying. I used all the original hems, so press all your seams and you’re done!
As always, email or comment with any questions! Happy sewing!


I can't wait to try this! I've been wanting to try the peplum trend, but I'm afraid it won't look good on me. What a safe way to try! Thank you for the tutorial. I want to become a better seamstress this year – I tend to rush things because I get too excited to get them done.
same!
Yes! I get too excited to take pics for every step…
http://sweetsimpleandstylish.blogspot.in
I always get scissor happy and get chopping, then realise I should have waited for the proper guidance and equipment!!! So many ruined items of clothes!
http://www.racholiverrambling.blogspot.com
Very clever idea for gathering a knit! I hadn't thought of that. It turned out very nice!
Here's another possibility to make things go faster. Since the bodice has to be cut down anyway, why bother taking the sleeves out with a seam ripper? Just cut the seam allowance off and go on!
This is so, so lovely! My goal this year (and many years past) is to become one with my sewing machine. After graduating from college in May, I will have time to take (sewing) classes for the first time in almost 5 years. I go to thrift stores and see things for their lovely colors and fabrics, but lack the know-how to refashion them. Your tutorials and some instruction should change that. Thanks!
I can see this ending up ALL OVER pinterest. And those Ginormous blouses are going to flying off the Goodwill shelves!
This really turned out GREAT!
This is great! I have been seeing peplum tops all over the place, I might just have to try this.
these are times where I wish I knew how to sew — this looks fab on you! xo
http://allthingsprettyandlittle.blogspot.com/
Wow… Great job! This looks awesome… And you're right about the zipper; it adds the perfect little touch 🙂
This looks amazing on you! I have seen other bloggers make peplums but they don't all look as flattering as this one turned out. Thanks for the inspiration. This is definitely on my to do refashion list 🙂
This is amazing!!! I am going to the thrift store this weekend, buying myself a huge top, and doing this! Love it!
love this! peplum tops are my favorite right now! Once we move in a few months (all of my stuff is in storage right now, including the sewing machine) I'm definitely doing this!
That turned out adorable! Love it!
Jenni
http://www.foundinmycloset.blogspot.com
Oh my goodness, this is fantastic! I love it.
oh my gosh, this is seriously my favorite top ever.
i love everything about it.
love the sleeve length,
the color
the peplum. you are amazing!
K
Oooh..I wanna try!
This is a great tutorial – and one of the best refashions I've seen lately. Nicely done!
MERRICK. Why are you so cute? This top looks fantastic. And you are so cute. Did I mention that?
This turned out so cute!! I love the green zipper too!
Kristina
Kristina does the Internets
Impressive!! This turned out to be so chic. Those yellow accessories were the perfect choice. I'm swooning over the whole outfit. Early in 2013 and your goal is accomplished!! You've got some major talent!!
This is fabulous! I love it!
Oh my goodness mer! This is your best work yet. I'm obsessed. My friends are so talented!!
Bigtime heart this! I have wanted to do a peplum top for awhile but was a little nervous, most peplums tend to be super short on my longer torso and I don't want a 90's esque belly shirt 🙂 I suppose finding a top that's supah-long to begin with would be a good start 🙂
And DUH I always have trouble with the armpit being too tight–gauging the seam should have been a no-brainer! That helps me a TON, you have no idea.
GENIUS!!! and looks absolutely beautiful on you. i cannot believe you are so skinny so soon!!!
I love your new top…well done!!! I want a sewing machine like yours is awesome!
Kisses!
Oh this is awesome – I can't wait to try it out myself. I always love your simple descriptions! 🙂
truly amazing! plus look how skinny you are!
Love this!! I have a pretty white material I have been saving for a peplum but i'm still not confident enough to tackle it. "Must Practice!". You did an amazing job.
You are so creative! My sister has that necklace and that is the perfect shirt to wear it with! Love it 🙂
http://sistersintherain.blogspot.com/
You are amazing!!!! GREAT JOB!
http://shannonhearts.blogspot.com/
yes! love it:)
This is VERY cute. I'm will never be brave enough to try it.
Also, I saw these shoes at Old Navy today (on sale!) but they only had them in sizes that were not mine. I might have shed some tears (but then I bought two pairs of colored pants for $7.50 each and I felt a little better).
My question is simply…. can you just make mine? haha. I do not have the skills to do this. But your's looks awesome!
Deidre || Love, The Skinnys
PS. Dont forget to come enter my giveaway!
Can she make me one too? lol
This is a fantastic tutorial, Merrick. Thanks for sharing! I have a million shirts I want to repurpose, and I never know how to take in shirts properly, so I really, really appreciate your detailed tutorial. I'm pinning this one. 🙂 I've also never seen a shirt scrunched in with elastic, then the elastic removed before. Awesome idea!
It turned out beautifully, Merrick! What a great idea, thanks for sharing. 🙂
well, although you make this look easy i am pretty sure i would never be able to make this. also i have never liked peplum until seeing this shirt on you. darling. brilliant. and i'm jealous.
That is so adorable it makes me want to go out and make one right now!
Such a creat re-fashion! Usually I just take shirts like that and just belt them so they have some sort of shape, but this is awesome! And I love the green zipper – it is probably my favorite part!
xoxo,
Laura
http://lauraisthriftingthroughlife.blogspot.com/
Seriously ahhh-mazing job! And how on earth can you look so good so soon after having a baby? I am both jealous and proud.
Oh My! The directions look so easy for the peplum. You look amazing and that is one killer DIY!
Very cute top! Just wondering, do you have any sewing tips for beginners? Your blog has totally inspired me to learn to sew. I've been checking out machines but have no idea where to start. I'm hopin to sign up for a local sewing class next month, but need to get myself set up with the right equipment first. Any tips you have would be super helpful!
What a genius idea! The peplum top turned out amazingly! I love recycling old clothes.
http://classypeach.blogspot.com/
I seriously love this so much!! I cannot even handle it. You are so talented!!
Oh CUTE!!! I'll have to look through my stash and see if I have anything I can use for this!
Oh Merk! Love this. Nice work. You have an eye for potential in those clothing items!
I love your tutorials! Thank-you so much for posting this. I have been wanting to make a peplum for myself, but I haven't wanted to go from scratch. This is so perfect!
http://www.thepreppylittlepolkadot.blogspot.com
This is adorable! I would never think of being able to do this with a giant shirt. I may have to get some more confidence in sewing and tackle this.
Fantastic job, I really love what you have done with the oversize top. I have a couple of t's I have been wondering what to do with so I think I will definately try this idea.
Can I make one suggestioon though; Next time try doing your side seams and your shoulder length adjustments before you cut the sleeve. Normally the sleeve head is larger than the arm scythe which is why you either have to ease the sleeve in (mens dress shirt) or run a gathering stitch around the sleeve (fuller design ladies blouses). If you cut the bodice first you will be able to measure the final arm scythe and make sure that your sleeve head is big enough (normally it is the length of the scythe plus an absolute minimum of 2cm ease depending on the design). If you do it in this order then you won't get the puckering around the armhole that you got and you will have a greater degree of mobility in the sleeve 🙂
Once again, fantastic design and congrats on a job well done.
Wow!I love this and love your site, it's so helpful and I can't wait to get a sewing machine:)
So cute! I will be repinning this for when I'm not pregnant. 🙂
Wow what a great job you did! Looks adorable and I love the zipper the best as well.
pjmscloset.blogspot.ca
You make all your projects look so easy! I love this! It looks beautiful on you.
http://whilecamdensleeps.blogspot.com
-Kara
I can't wait to try this! I have some over-large shirts that I need to do this to. Beautiful!
Merrick,
Did you use your sewing machine to serge the edges or do you have a separate serger?
I think I have the same Kenmore sewing machine, but didn't know it had serging capabilities.
Yes, I used a separate serger. I have a Brother Serger and the Kenmore sewing machine.
i love this! super cute!
Wow this is totally cute cute cute!
Do you find it easier to gather with elastic than by a basting stitch? Just wondering. I have never gathered with elastic in the way you did on this project.
I need to go to the thrift store this week and get a big blouse so I can make this, asap. LOVE IT! You did a fantastic job 🙂
You are so talented! The peplum blouse looks too cute on you 🙂
Annie
The Other Side of Gray
I wish i could sew….i wish i could sew…eeerrr
seriously you amaze me…………… =)
How are you this good?! Amazing refashion!
http://www.kacieskloset.blogspot.com
http://www.daisyraeboutique.com
What an impressive sewing job! This top is so cute and well done, and looks great on you. I love it!
This looks awesome! Great refashion =)
Thank you for posting such a thorough tutorial!
Love the transformation, especially with the green zipper! My first finished sewing project was a peplum top, so I know how much work you put into that top. Great Job!
You are amazing! That came out fabulous.
This is absolutely my favorite outfit I have ever seen on anyone. So, so great Merrick!! You are fabulous! We miss you lots!
great idea to update an old shirt!! love it with the necklace!
Hey Marricks, this was very inspiring to me what you did, so i´ve tried it myself 🙂 thak you for the tutorial.
If you wanna see how i did that visit my Blog 😉
http://brigh10up.blogspot.de/
Amazing transformation! What fabric is this blouse made of? You mentioned that it was not stretchy…
Thank you! It's some kind of polyester, I think.
I have a really oversized cotton shirt I'm going to try this with, I think if I use some really light fusing I can stiffen the cotton just enough for the peplum to look right! experiments!!
I'll start off with, I absolutely love your name. I gave that exact name to my second son forty years ago, and have since that time encountered one other person that share it. I also love your refashion. It is all that, and the bag of chips girlie. I have a ginormous black top in my stash for the fourth year now, and every so often I will pull it out and try to decide on what it is to become. Now that has been buried. Thanks so much for the share.
This is an awesome tutorial. Make sure that when you sew in the zipper, you go all the way to the top of the actual zipper. That way you don't get the gap at the top of the shirt like you have here. Otherwise, I love this
This is an awesome tutorial. Make sure that when you sew in the zipper, you go all the way to the top of the actual zipper. That way you don't get the gap at the top of the shirt like you have here. Otherwise, I love this
You are an obscene seamstress, and I totally dig your crafting.
Kudos,
Hunny
I absolutely love your blog…this is so cute…what kind of fabric is the shirt?
Great Job, Keep It Up.
The original tag is gone, so I don't know exactly — but it's some kind of polyester.
And thank you!
And now I want to turn all of my tops into peplums.
Thanks for the great tutorial. I have a super long torso and can't wear peplums from the store.
Very cool!
Very nice! thanks for this inspiring tutorial!
Oh I love this. I am stopping at a thrift store after work to pick up an oversized shirt to do this! Great post. Thanks!
hi, just wondering if you think this can be done with a heavier weight t-shirt?
thanks,
suzanne joganic.hill
frustrated artist
Yes, I think a heavier weight shirt should be fine!
merci
Awesome idea but I am going to tweak it for an empire waist and see how it goes, bought a beautiful teal t-shirt at Wally World but way huge and boxy going to fix that 😉
Thanks for starting the ball rolling 🙂
Cooki m
This looks lovely, especially on you, you're very cute. I love the green zip in the back, you could really have fun with colours(on my small phone screen I thought the yellow necklace was part of the top) – it looks great.
May I give you one tip as I am a patternmaker, the sleeves should be slightly bigger than the armhole rather than the way you have it here, you should try to stretch most of the excess into the top (head) of the armhole as you sew it in. this will give you a nicer more squared look to the shoulder when worn.
All the best with your projects, I'll enjoy seeing more.
cheers, Karyn
Thanks for the tip!
Hi Merrick, I immediately fell in love with this top and eventually made it from a beautiful navy fabric. I would love it if you could check out my blog here: http://moramora.weebly.com/1/post/2013/09/navy-peplum-top.html
Thanks for this wonderful idea!
Cheers, Anne
You look fantastic! Love your outfits. It fits pretty good. I'm glad to see a fitted outfit & not an over sized one. Love your whole look. Gorgeous girl!
stylish blue shirt
Awesome job! You are very talented. It looks so cute on you.
Fantastic ! Superb!brilliant idea ! you make it look easy , it is well explained ! Bravo!
Your pictures alone make it look like it would be so clear to follow! Excellent job with that and I hope to try it myself one day. Thank you for sharing.
Fantastic job, I really love what you have done with the oversize top. I have a couple of t's I have been wondering what to do with so I think I will definately try this idea.
Can I make one suggestioon though; Next time try doing your side seams and your shoulder length adjustments before you cut the sleeve. Normally the sleeve head is larger than the arm scythe which is why you either have to ease the sleeve in (mens dress shirt) or run a gathering stitch around the sleeve (fuller design ladies blouses). If you cut the bodice first you will be able to measure the final arm scythe and make sure that your sleeve head is big enough (normally it is the length of the scythe plus an absolute minimum of 2cm ease depending on the design). If you do it in this order then you won't get the puckering around the armhole that you got and you will have a greater degree of mobility in the sleeve 🙂
Once again, fantastic design and congrats on a job well done.
اضغط هنا
اضغط هنا
Fantastic job, I really love what you have done with the oversize top. I have a couple of t's I have been wondering what to do with so I think I will definately try this idea.
Can I make one suggestioon though; Next time try doing your side seams and your shoulder length adjustments before you cut the sleeve. Normally the sleeve head is larger than the arm scythe which is why you either have to ease the sleeve in (mens dress shirt) or run a gathering stitch around the sleeve (fuller design ladies blouses). If you cut the bodice first you will be able to measure the final arm scythe and make sure that your sleeve head is big enough (normally it is the length of the scythe plus an absolute minimum of 2cm ease depending on the design). If you do it in this order then you won't get the puckering around the armhole that you got and you will have a greater degree of mobility in the sleeve 🙂
Once again, fantastic design and congrats on a job well done
شركة مقاولات بالرياض
تغليف اثاث
شركات نقل العفش بالرياض
شركة تنظيف خزانات بجدة
شركة تخزين اثاث بجدة
شركة تنظيف شقق بجدة
مؤسسة رش المبيدات حشرية بجدة
شركة تنظيف خزانات بالرياض
مصر عملية المرارة بالمنظار
مكافحة حشرات الفراش بالرياض
شركات ابادة الحشرات
شركة تسليك مجارى بالرياض
شركة تنظيف خزانات بالخرج
شركة عزل أسطح بالخرج
شركة تنظيف شقق بالمدينة المنورة
شركة تنظيف فلل بجدة
شركة نقل اثاث بالدمام
شركة رش مبيدات بالدمام
مكافحة الحشرات بالخبر
تنظيف فلل بالرياض
شركة كشف تسربات المياه بالرياض
اضغط هنا
شركة عزل اسطح بالأحساء
شركة كشف تسربات المياه بالدمام
شركة تنظيف موكيت بمكة
ama
amazing!!! i would like to know what material is the blouse. thank you:-)
Wonderful redo, you are very talented, thanks for the ideas!
I love the pics. Thanks for sharing. Unlockpwd
Can you actually do this with a regular cotton T? I know it will be a little less formal, but do you think it will work? What’s the best fabric for it do you think? Thanks! I love peplum, and you do it so nicely! =)
yes, absolutely!
Thanks so much!!
Hey, Merrick! I did it today, and it turned out… well, I’m gonna try again! I didn’t quiet have all the materials needed, like say, the elastic. I didn’t have one, so I cut up my belt, which got really stringy, so it threw off the stitch. It’s a little crooked, but I still accomplished something! I now know I can do it! =) Thank you so much,
-Jazzy
Thank you! This is awesome! There’s hope for my pile of huge 6X.. (“sorry..only size we have in that color…”) vacation resort souvenir tshirts! That trick you did with the elastic waist is way cool..it made spacing the fabric a breeze! Sharing this one!! 🙂
What a look! Thank for your tuto! You’re very talented!
[…] (from top left): Peplum Refashion via Merrick’s Art, Riding Peplum pattern by April Rhodes from Sew Charleston, Peplum DIY from an XL Tshirt via Oh, […]
Great Post! You can get moss satin ribbon with the best deal for your project! Have a try here?
I love this tutorial! You did such an awesome job! I’m going to try it out and add lace to the top and peplum. I’m such a sucker for lace lately. 🙂
Hi Merrick, this is a great tutorial, and I have a couple of shirts in mind for it! I have dabbled at sewing for many years, and you have taught me a few things! So I would like to repay that favor (if nobody has mentioned it yet): to gather fabric, such as the top of the peplum, simply hand baste, then pull the thread until it measures the same as the bodice… I think there is even a machine sewed version of this trick, but I don’t know it. 🙂
Are you tired of being human, having talented brain turning to a vampire in a good posture in ten minutes, Do you want to have power and influence over others, To be charming and desirable, To have wealth, health, without delaying in a good human posture and becoming an immortal? If yes, these your chance. It’s a world of vampire where life get easier,We have made so many persons vampires and have turned them rich, You will assured long life and prosperity, You shall be made to be very sensitive to mental alertness, Stronger and also very fast, You will not be restricted to walking at night only even at the very middle of broad day light you will be made to walk, This is an opportunity to have the human vampire virus to perform in a good posture. If you are interested contact us on
Or Add up on Whats-app +233248104710
[…] Tutorial: merricksart […]
It was gobsmacked blog! This work is kinda unique with others, my friends must see this. I will tell it when we have time for laundry service delivery.
Hi,
Thank you so much for sharing!
Recently, I have attended my good friend’s wedding and found it gorgeously great. And she recommended to me this online shop
(https://www.weddinginvitespaper.com/106251-wedding-invitations) which customizes quality and cheap wedding invitations.
I attach the link here, for everyone has to hold a wedding someday.
You can find all kinds of elegant invitations there and the customer service is great. They have professional designers to provide unlimited proofs through email, so, don’t worry about the final result.
Hope this advice helps you!
I really like reading through a post that can make people think. Also, many thanks for permitting me to comment!Hacking Blogs
Stitchmax, An Enhanced Gap Stitch Motifs Software That Comes with High Productivity and All Advanced Feature of Machine Embroidery Designing. It Has Very Unique And Exclusive Features For Stitch Effects, Drawing Methods, Automated Punching And Decorative Tools Which Are Specially Customized For Professional Designers, Industry Owners, Training Institutes, Embroidery Shops, And Apparel Designers.
Once you start laundry service, begin by exploring your service area. Singapore delivery. Seek the business-capable places in your town and do your research. People, giant emplomostyers in your area and washing and dry cleaning areas can be found through some online research.
The call for the pilot licence holders is once more growing stronger and the aspirants can now in reality see their goals flying to reality. CEA Aviation, with its specialisation in aviation and considerable degree in countrywide and worldwide excellent best flight dispatcher training in india is among a selected few in India and is proving to be a in reality best launch pad for pilots with its International institutions for the amazing feasible Pilot training.
We are prime and the first-class institute for a Best Digital marketing institute in Laxmi Nagar & throughout India. This path makes grabbing an awesome bundle more energizing. Furthermore, it will enhance your ability in case you are a working expert and additionally offer you with sufficient opportunities to paint as a freelancer after final touch of the digital marketing course.
We are prime and the first-class institute for a Digital marketing institute in Laxmi Nagar & throughout India. This path makes grabbing an awesome bundle more energizing. Furthermore, it will enhance your ability in case you are a working expert and additionally offer you with sufficient opportunities to paint as a freelancer after final touch of the digital marketing course.
The International English Language Testing System is an worldwide standardised test of English language skill ability for non-nearby English language audio machines and for all of the aspirants who prefer to do IELTS Preparation. If you are planning to test or work remote places you then need to take the IELTS test to prove your English language competencies. Then you need to be part of the great ielts training in laxmi nagar for the coaching IELTS check. Here you could locate all the Top ielts coaching in laxmi nagar with touch info and training addresses.
Join the Illuminati Freemason Brotherhood!!! Email illuminatisecretetemple666 [@] yahoo [.com]………………………………………………….
[…] rätt? Då kanske du skulle komma överens lite bättre med något som denna handledning från Merricks konst som lär dig hur man förvandlar en mycket lös blus till en mer figursydd topp i peplumstil som […]
[…] Source: merricksart […]